
Amazon Web Services (AWS) 向けの Red Hat Enterprise Linux (RHEL) を実行すると、強化されたスケーラビリティ、柔軟性、コスト効率、多様なマネージドサービスへのアクセスなど、さまざまなメリットが得られます。Amazon Web Services のグローバルなインフラストラクチャを使用することで、Red Hat Enterprise Linux ワークロードをスケーリングして変化する要求に対応し、設備投資を削減し、各種の購入モデルを活用できます。この製品には Red Hat と Amazon Web Services による 24 時間年中無休のサポートが含まれています。
この記事では、Amazon Web Services 向け Red Hat Enterprise Linux を設定するためのヒントと、その価値を最大化するためのアドバイスを紹介します。この記事は、既存のワークロードからクラウドに移行する場合でも、新たに始める場合でも、AWS 上で Red Hat Enterprise Linux インスタンスを購入、デプロイ、構成、管理するプロセスにおける落とし穴を回避できるようにすることを目的としています。
Red Hat Enterprise Linux for AWS の購入オプション
Red Hat Enterprise Linux for AWS を購入するには、以下の 2 つの方法があります。
- AWS Marketplace で直接購入できます。PAYG (従量課金制) か、1 年または 3 年の期間で購入できます。Amazon EC2 向けの Red Hat Enterprise Linux のベースイメージを使用します。AWS から L1 テクニカルサポートを受けることができます。
- Red Hat または Red Hat パートナーからサブスクリプションを購入します。このオプションが移行シナリオの場合は、Red Hat Cloud Access を使用して AWS に移行できます。これは、サブスクリプションの持ち込み (BYOS: サブスクリプションの持ち込み) とも呼ばれます。さらに、独自のイメージまたはゴールドイメージを仮想マシン (VM) としてデプロイできます。Red Hat からの L1 テクニカルサポートは継続します。
このいずれの方法も等しく有効で、どちらを使用しても、Red Hat Enterprise Linux インスタンスを取得し、Red Hat から更新が提供されると同時に自動的に更新を受け取ることができます。どちらを選ぶかに関しては、慎重に考慮する必要があります。後程説明するように、これら 2 つは目的とするユースケースが異なります。
エンタープライズ向け Linux のパワーを活用する
Red Hat Enterprise Linux が提供するのは、オペレーティングシステム (OS) へのアクセスだけではありません。これは AWS 環境向けに設計されており、パフォーマンス、管理、セキュリティ機能を最適化する組み込みの機能と統合が含まれています。
- 事前構成済みの AWS 固有のパフォーマンス・プロファイルにより、より高速で一貫性のあるデプロイメントが可能です。
- Red Hat Enterprise Linux for AWS は、パフォーマンスおよび診断データを収集、分析、可視化する機能を提供します。
- AWS CLI (
awscli2) は、Red Hat Enterprise Linux for AWS のイメージおよびリソースのコマンドライン・インターフェースによる管理を可能にします。 - イメージモードは、コンテナネイティブのツールでクラウド運用を最適化し、ブート可能な Red Hat Enterprise Linux コンテナイメージと不変のシステムイメージを有効にして、攻撃対象領域を削減します。
Red Hat Lightspeed は、Red Hat Enterprise Linux を単一プラットフォームとして実行するのに役立ちます
Red Hat Lightspeed は、追加費用なしで Red Hat Enterprise Linux に付属しており、よりスマートかつ迅速に作業することで、インフラストラクチャのレジリエンスとオペレーショナル・エクセレンスを向上させます。強化されたプラットフォーム機能は、以下を提供します。
- 可視性:Red Hat Enterprise Linux の環境全体を包括的に表示することで、管理と監視を単純化します。
- プロアクティブなアラート:障害やセキュリティイベントが生じる前に、管理者や関係者に警告を事前に発します。
- 偏差分析:すべての環境のデータを分析し、アプリケーションのパフォーマンスに影響を及ぼしかねないパフォーマンスのパターンや頻度分布を明らかにします
- コンプライアンス:業界標準に照らしてシステムを監視し、コンプライアンスの維持を支援し、セキュリティ体制を強化する取り組みを支援します。
Lightspeed は多様なデプロイに対する Red Hat Enterprise Linux の管理を効率化し、インストール場所にかかわらず一貫したエクスペリエンスを提供します。これは、ワークロードを AWS で実行しながら、オンプレミスでも一部のワークロードを実行している場合に特に有効です。
この機能には、Red Hat Hybrid Cloud Console からアクセスします。お使いの AWS アカウントと Red Hat アカウントがリンクされていることと、Insights に登録していることを確認してください。AWS Marketplace で PAYG イメージを介して Red Hat Enterprise Linux を利用している場合、このアカウント接続は自動的に行われないことがあります。
始める前に考慮しておくべきポイント
始める前に、いくつかの決定要因について十分時間をかけて検討してください。頻繁に寄せられる質問を以下に示します。
Red Hat Enterprise Linux のデプロイメントはどのようなユースケースで使用する予定ですか
Red Hat Enterprise Linux インスタンスを AWS にデプロイする方法は、ユースケースに応じて異なります。長期間にわたって継続的に実行される重要なワークロードには、永続的で安定した、可用性の高いクラウドインフラストラクチャが必要です。特定の期間には需要が高く、その他の期間は需要が低くなるような需要が変動するワークロードも、クラウドの弾力性の恩恵を受けます。ピーク時にはリソースを迅速にスケールアップし、オフピーク時にはスケールダウンして、コスト効率を最適化できます。このように、推奨されるデプロイメントモデルはユースケースによって異なります。
最も適切なデプロイメントモデルは何ですか
デプロイメントモデルの選択にあたって、どのような支払い方法が適切かを検討する必要があります。年間サブスクリプションにも (使用量に基づく) 従量課金制オプションにも、メリットとデメリットがあります。理想的な選択肢は、特定の要件、予算の制約、予測されるワークロードのパターンに大きく依存します。予算が予測できることと請求が単純なことが最重要なら、月額または年額料金が最も適していると考えられます。それに対して、柔軟性、コスト効率、迅速なスケーリング機能が重要なら、従量課金制モデルのほうが良い選択肢といえるでしょう。
- 1 年単位のサブスクリプション:年間サブスクリプションは、予算を予測でき、請求が単純で、長期にわたるプランでは一般に価格が手頃です。固定料金なので、使用量を厳しく監視する必要もありません。サブスクリプションは、Red Hat アカウントマネージャーまたは認定 Red Hat パートナーを通じて入手できます。クラウド環境とオンプレミス環境を対象とする Red Hat Hybrid Committed Spend プログラムを利用することもできます。
従量課金制 (PAYG):この支払いオプションは柔軟性が高まり、長期的な利用に縛られません。また、AWS 確約利用料プログラム、Enterprise Discount Program (EDP) の対象となります。この使用量ベースのアプローチでは、使用したリソースの分だけ課金されるので、コスト配分が最適になり、需要の変動に応じて迅速にスケーリングできます。ただし、このモデルでは予測できないコストが生じることがあり、予算超過を避けるために使用量を常に監視する必要があります。
EC2 を通じて PAYG を使用している場合は、Red Hat サブスクリプションを付加する必要はないという点に注意が必要です。Red Hat Enterprise Linux サブスクリプションをサブスクリプション・マネージャーから付加すると、EC2 コンソールから行った購入内容がキャンセルされず、二重請求が発生することがあります。
AWS 上に Red Hat Enterprise Linux をデプロイする
自分の組織にとって最適なデプロイメントと支払いオプションを選んだら、開始するために、次の 2 つのものが必要になります。AWS アカウント と Red Hat アカウントです。このいずれかを持っていない場合は、設定してから始めましょう。
AWS 上の Red Hat Enterprise Linux の支払い方法がいくつかあるのと同様に、インスタンスのデプロイ方法も複数あります。
AWS を通じて購入した Red Hat Enterprise Linux のセットアップ
AWS から Red Hat Enterprise Linux を購入された場合のセットアップ方法は、以下のとおりです。
1.AWS へのサインイン
AWS マネジメントコンソールにサインインします。EC2 ダッシュボードを開きます (Services にあります)。EC2 メニューで Instances を選択します。
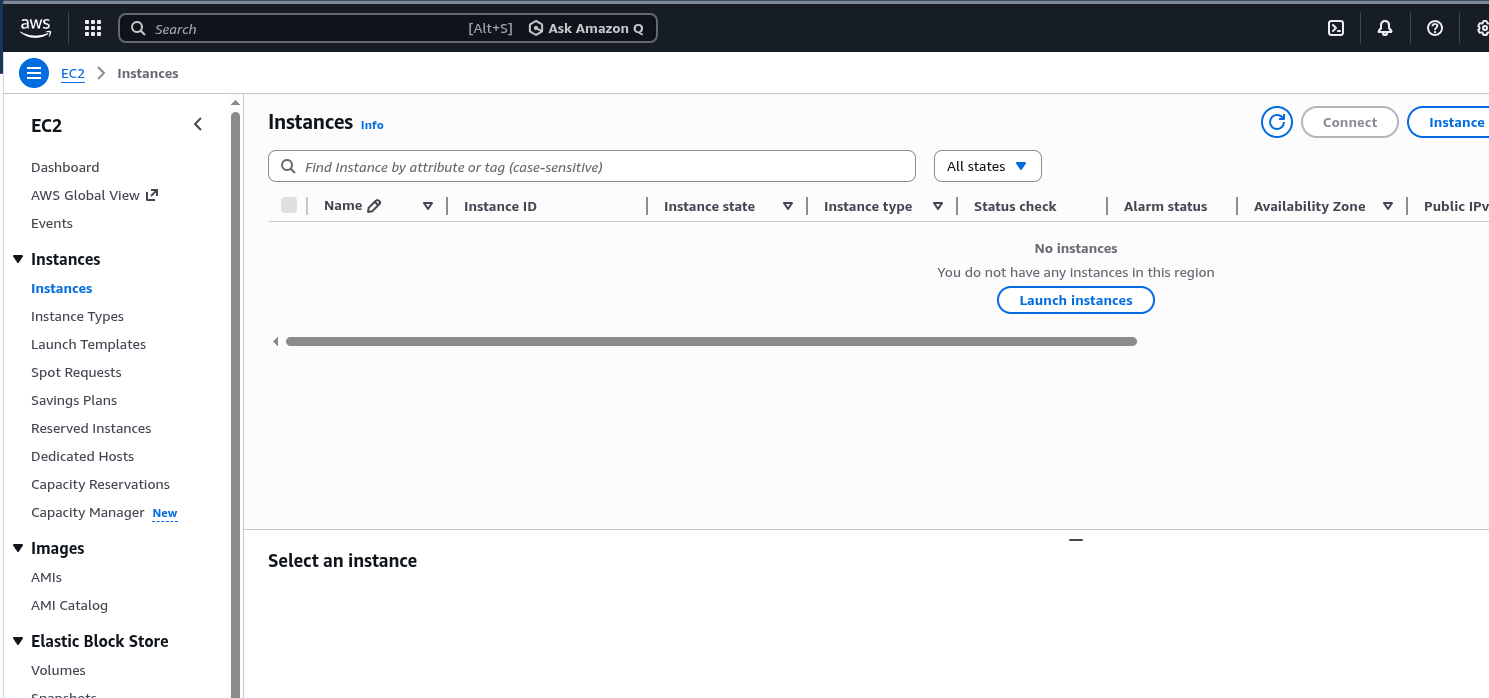
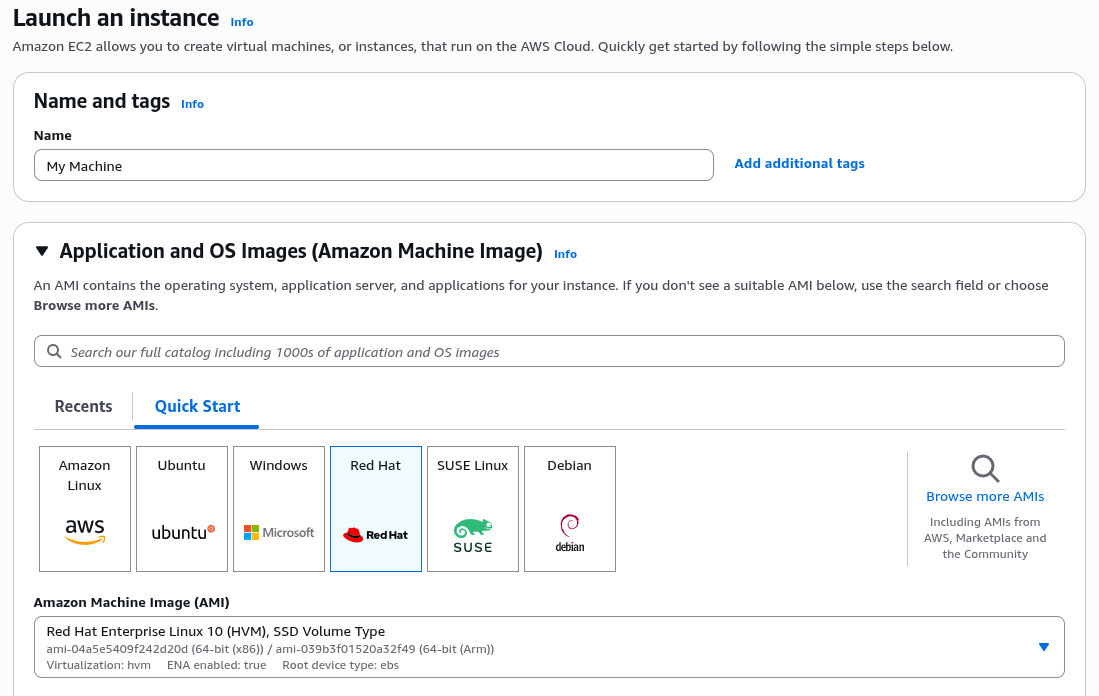
2.新しいインスタンスの作成
Launch Instance をクリックして、新しいインスタンスを作成します。インスタンスに選択できる Amazon Machine Images のリストが表示されます。使用する Red Hat Enterprise Linux のバージョン (Red Hat Enterprise Linux 10 など) を選択します。
3.インスタンスタイプの選択
次に、インスタンスタイプを定義する必要があります。Amazon EC2 では、さまざまなユースケースに適した、CPU 、メモリー、ストレージ、およびネットワーク容量の異なる各種のインスタンスタイプを提供しています。ビジネスニーズに最も適した組み合わせを選択します。
4.インスタンスの詳細の設定
Configure Instance Details ページで、インスタンス数、購入オプション、ネットワーク、サブネットなど、インスタンスの詳細設定を指定できます。これは後で変更できるので、デフォルト設定のままで Next:Add Storage を選択して先に進むこともできます。
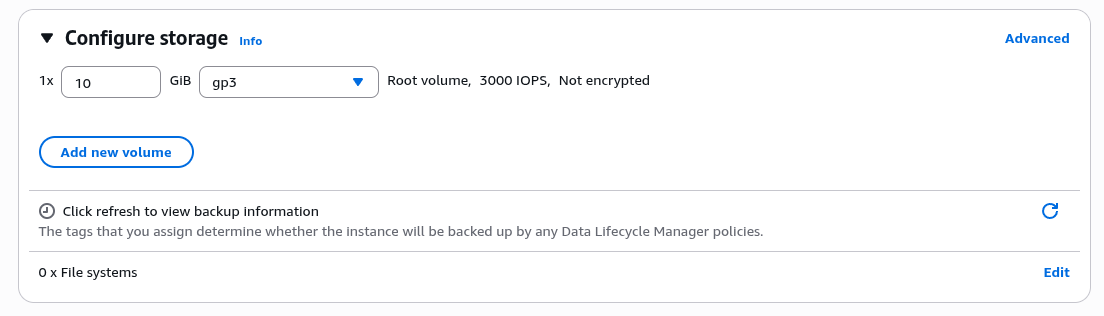
5.ストレージの追加
ここでは、インスタンスに新しいボリュームを追加したり、ルートボリュームの設定を変更したりすることができます。これも必要ならば後で設定し直せます。
6.タグの追加
Add Tags ページの次のステップで、タグを使用してインスタンスにメタデータを追加できます。このステップは任意です。
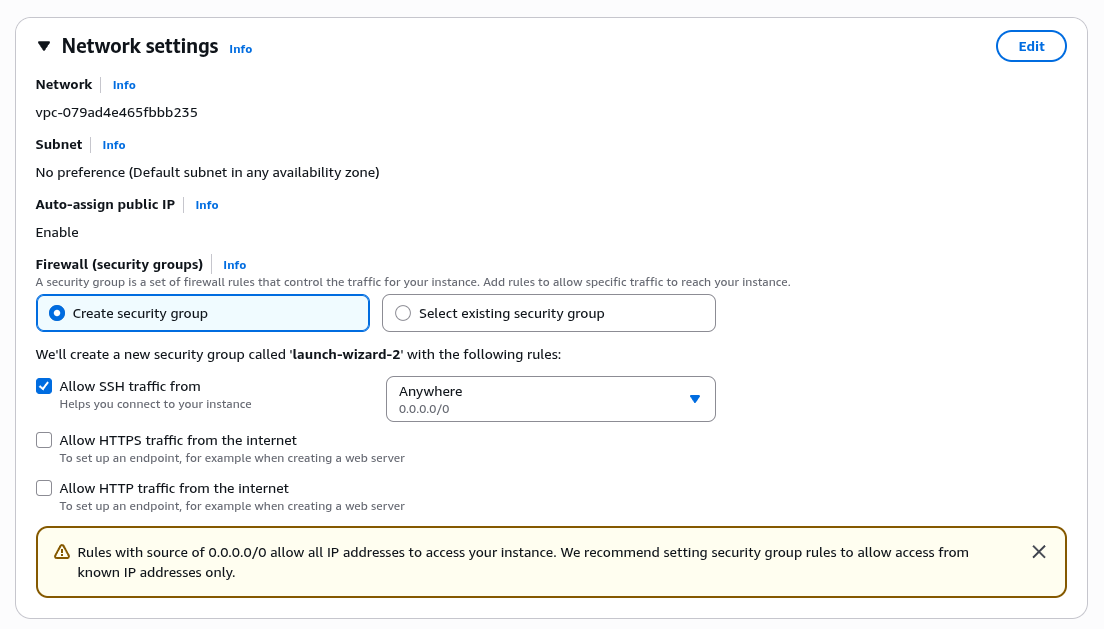
7.セキュリティの設定
これは極めて重要なステップで、インスタンスのトラフィックを制御するファイアウォールルールを定義します。新しいセキュリティグループを作成して、適切なルールを設定します。基本のセットアップでは、IP アドレスからの SSH トラフィック (ポート 22) を許可するルールを追加することをお勧めします。
8.確認して起動
インスタンス設定を確認します。何も問題がなければ、Launch をクリックします。既存のキーペアを選択するか、新しいキーペアを作成するように求められます。このキーペアを使用して、実行した後のインスタンスに安全に接続します。
9.キーペアの作成
既存のキーペアがない場合は、Create a new key pair を選択します。参照できるようにキーの名前を指定し、ダウンロードします。このファイルは安全な場所に保存してください。再度ダウンロードすることはできません。このキーペアを紛失した場合、インスタンスに接続できなくなります。
10.起動ステータス
Launch Instances をクリックすると、AWS でインスタンスの作成と初期化のプロセスが開始されます。この操作の進行状況を示す起動ステータスのページにリダイレクトされます。
11.インスタンスの表示
ページの下部にある View Instances を選択して、EC2 ダッシュボードに戻ります。そこに新しいインスタンスが一覧表示されます。表示されない場合は、ページに情報が反映されるまで数分待機してください。
以前オンプレミスにデプロイされていた Red Hat Enterprise Linux インスタンスのインストール
以前にデプロイされたオンプレミスの Red Hat Enterprise Linux インスタンスから移行するには、前のセクションのセットアップを行う前に、いくつかのステップを追加する必要があります。始める前に、ダウンタイムやデータ転送コストに関するプランも評価する必要があります。
このセクションでは、仮想環境から移行することを前提としています。オンプレミスインスタンスがベアメタルで実行されていた場合は、ここには記載されていない追加の手順が必要になります。
1.バックアップの作成
バックアップの作成は、この手順における重要なステップです。システムの根幹に変更を加えるため、予定通りに進まない場合には、適切なバックアップが唯一の復旧方法になる可能性があります。
2.オンプレミスインスタンスのディスクイメージを作成する
サーバーを停止できるなら、dd コマンドを使用して イメージを作成 できます。サーバーを停止できない場合は、Logical volume management (LVM) を使用してイメージを作成できます。
このディスクイメージをファイルに保存します。
3.Amazon S3 バケットへのディスクイメージのアップロード
AWS マネジメントコンソールにサインインし、Amazon S3 バケットを作成して(または既存のバケットを使用して)、ディスクイメージファイルをバケットにアップロードします。
4.ディスクイメージからのスナップショットの作成
AWS マネジメントコンソールから、EC2 ダッシュボードに移動します。そこから、Elastic Block Store の Snapshots に移動し、S3 バケット内のディスクイメージファイルから新しいスナップショットを作成します。
5.スナップショットからの Amazon Machine Image の作成
引き続き EC2 ダッシュボードで、 images の AMIs に移動し、先ほど作成したスナップショットから新しい AMI を作成します。既存のオンプレミスデプロイメントの正しいアーキテクチャ、ルートデバイス名、仮想化タイプを指定してください。
6.AMI からの EC2 インスタンスの起動
AMI の準備ができたら、そこから新しい EC2 インスタンスを起動できます。EC2 ダッシュボードから Launch Instance をクリックして、 My AMIs セクションから新しい AMI を選択します。ここから先は、他の EC2 インスタンスを起動する場合の手順と同様です。インスタンスタイプを選択し、インスタンスの詳細を設定し、ストレージを追加し、タグを追加し、セキュリティグループを設定して、確認して起動します。
AWS を通じて購入した Red Hat Enterprise Linux のセットアップセクションの手順に従って、プロセスを完了できます。
7.オンプレミスのデプロイメントに一致するように設定する
インスタンスを実行したら、場合によっては追加の設定を行う必要があります。インスタンスに接続して、すべてが予期した通りに実行されていることを確認します。オンプレミスインスタンスに合わせるために、アップデートの実施、設定の変更、その他の変更を行う必要があります。
実績がありテスト済みで信頼できる
Red Hat Enterprise Linux for Amazon Web Services (AWS) を実行することで、スケーラビリティ、柔軟性、コスト効率が向上し、幅広いマネージドサービスへのアクセスが可能になるなど、さまざまなメリットが得られます。Amazon Web Services のグローバルなインフラストラクチャを活用することで、Red Hat Enterprise Linux ワークロードをスケーリングして変化する要求に対応し、設備投資を削減できます。つまり、AWS 上の Red Hat Enterprise Linux は、クラウドにデプロイする場合に柔軟性を発揮します。Red Hat Enterprise Linux for AWS のセットアップに関する具体的な技術プロセスの詳細を確認してください。
製品トライアル
Red Hat Enterprise Linux | 製品トライアル
執筆者紹介
I am focused on creating content for the RHEL community. Over a Decade in IT, cybersecurity advocate, conference organizer, and open-source enthusiast. Hobbies include homelabs, podcasting and 3D Printing.
チャンネル別に見る

自動化
テクノロジー、チームおよび環境に関する IT 自動化の最新情報

AI (人工知能)
お客様が AI ワークロードをどこでも自由に実行することを可能にするプラットフォームについてのアップデート

オープン・ハイブリッドクラウド
ハイブリッドクラウドで柔軟に未来を築く方法をご確認ください。

セキュリティ
環境やテクノロジー全体に及ぶリスクを軽減する方法に関する最新情報

エッジコンピューティング
エッジでの運用を単純化するプラットフォームのアップデート

インフラストラクチャ
世界有数のエンタープライズ向け Linux プラットフォームの最新情報

アプリケーション
アプリケーションの最も困難な課題に対する Red Hat ソリューションの詳細
仮想化
オンプレミスまたは複数クラウドでのワークロードに対応するエンタープライズ仮想化の将来についてご覧ください