
In two previous articles, you learned how to configure two SIP phones and the Asterisk dialplan to enable the phones to call each other. Having two phones that can call each other is great, but most organizations want to connect their phone system to the public switched telephone network (PSTN) to allow for inbound and outbound calling to others outside of the organization. In this article, you will learn some background about how to connect to the PSTN and you will see the Asterisk configuration needed for this connectivity.
Note: I’ve mentioned it several times throughout this series, but it is especially important for this article to understand how to secure your phone system. Connecting to a telephony provider can open you up to all sorts of issues, such as toll fraud, if you aren’t careful about controlling who can connect to your phone system (e.g., via firewall rules). Be sure to read the README-SERIOUSLY.bestpractices.md documentation that comes with the Asterisk source code and understand every piece of configuration that you add to Asterisk.
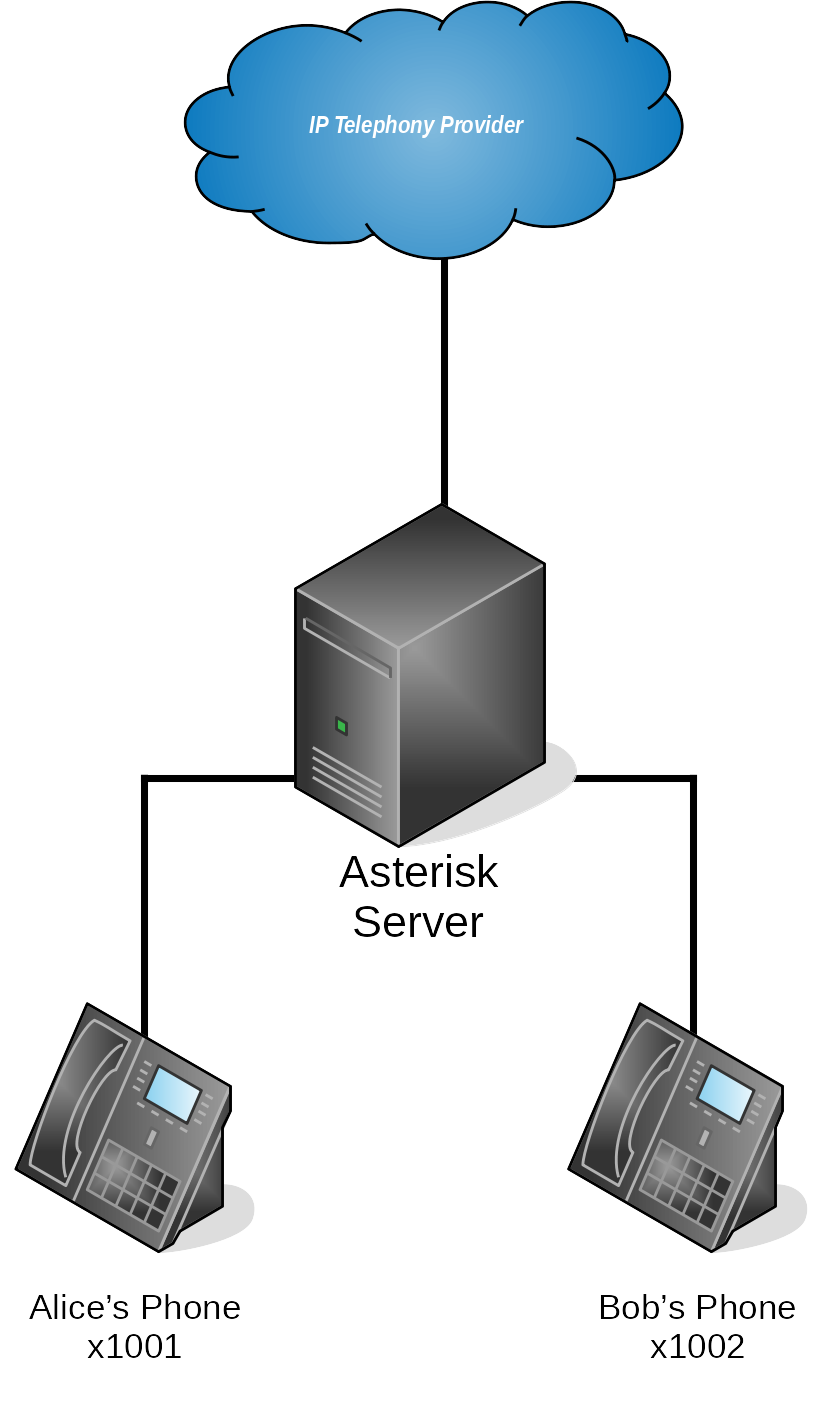
Connecting to the PSTN
Obtaining a telephone number and connecting your phone system to the PSTN might sound like a difficult task, but it’s actually pretty easy. Larger organizations may choose to use a local telecommunications provider or their local Internet company, but there are also a variety of online providers available (e.g., Twilio and VoIP.ms, among many others). I will be using VoIP.ms for the phone numbers in this article.
No matter who you choose, the process is fairly straightforward. You will buy a phone number (often called a direct inward dial, or DID), and you’ll configure your phone system to connect with the provider’s phone system via SIP. This setup is often referred to as a SIP trunk. The process of configuring your phone system to work with your chosen provider can vary, so it’s always best to consult the provider’s documentation or work with their voice engineers if you run into trouble.
Let's take a look at the general best practices for configuring your phone service. These are not comprehensive, but they should provide a base of sound advice when working with your provider:
- Obtain the provider’s endpoint IP (or IPs) and heavily restrict SIP and RTP communication to only those IP addresses. Some providers also support only allowing your account to connect from a specified list of IPs.
- Ensure that your SIP connection minimally uses a username and password for security. If your provider supports mutual TLS authentication, investigate that option as well.
- Don’t sign up for features that you do not need. If you won’t be placing international calls, then don’t sign up for international calling. Doing this lessens your attack surface if your phone system is ever breached. Toll fraud can be costly. You can avoid the risk of expensive international calls by opting out of international calling.
- Investigate the fraud detection and prevention options that your provider has available. Some providers can immediately alert you if they detect any suspicious phone calls being placed from your account.
PJSIP configuration
The first step in configuring PSTN connectivity is to define the SIP configuration necessary for Asterisk to communicate with the IP telephony provider. This information will vary a bit by provider, but many of them provide information about the parameters that you need (VoIP.ms actually provides Asterisk-specific instructions):
In my case, the configuration in /etc/asterisk/pjsip.conf looks like this:
[voipms]
type=endpoint
transport=transport-udp
context=inbound-calls
disallow=all
allow=ulaw
auth=voipms
outbound_auth=voipms
aors=voipms

[voipms]
type=registration
transport=transport-udp
outbound_auth=voipms
client_uri=sip:redacted VoIP.ms username@newyork1.voip.ms:5060
server_uri=sip:newyork1.voip.ms:5060

[voipms]
type=auth
auth_type=userpass
username=redacted VoIP.ms username
password=redacted VoIP.ms password

[voipms]
type=aor
contact=sip:redacted VoIP.ms username@newyork1.voip.ms

[voipms]
type=identify
endpoint=voipms
match=newyork1.voip.ms
Most of this configuration probably looks familiar, but this configuration does introduce two new PJSIP section types: a registration and an identify. The registration section tells Asterisk to explicitly register with the upstream voice provider’s server. The identify section tells Asterisk that SIP traffic coming from newyork1.voip.ms should match the voipms endpoint.
After reloading PJSIP, I can see that my local Asterisk server successfully registered with the provider’s SIP infrastructure. Note that issues during this stage of the process are fairly common, and you may need to work with your provider to understand what "they see" so that you can effectively troubleshoot:
asterisk-1*CLI> pjsip show registrations

<Registration/ServerURI..............................> <Auth..........> <Status.......>
==========================================================================================

voipms/sip:newyork1.voip.ms:5060                  voipms            Registered

Objects found: 1
Inbound dialplan configuration
Next, Asterisk has to be told what to do with incoming and outgoing calls. Incoming and outgoing calls in Asterisk aren’t fancy, they are just extensions in the dialplan like any other extension. I will discuss incoming calls first. Like any programming language, it’s important to understand what your goals are before you start writing code. In my case, I wanted a dialplan that would:
- Answer an inbound call from the DID that I purchased from my provider.
- Allow the user to enter an extension (one for Alice, two for Bob).
- Call the appropriate user once the extension was dialed.
Notice that in the above PJSIP configuration, I am using the inbound-calls context for calls from my SIP provider. Here’s what that context looks like in /etc/asterisk/extensions.conf:
[inbound-calls]

exten => 1234567890,1,Answer()
same => n,Playback(hello)
same => n,WaitExten(30)
same => n,Hangup()

exten => 1,1,Answer()
same => n,Dial(PJSIP/alice-softphone)

exten => 2,1,Answer()
same => n,Dial(PJSIP/bob-softphone)
Notice that I replaced my real DID with the fake 1234567890 for privacy reasons. You will want to use your real DID if you are following along. Also, notice that my phone number follows a United States numbering convention (a three-digit area code followed by a seven-digit number).
Let’s step through this contents of this configuration together:
- When my DID is called, Asterisk matches the 1234567890 extension. It answers the call.
- Asterisk then plays a built-in "hello" message. In a real environment, you might want to record your own prompts for Asterisk to use.
- Asterisk then calls the WaitExten application with a value of 30. This value tells Asterisk to wait up to 30 seconds for the user to enter an extension.
- Assuming the user enters an extension of "1" or "2", the dialplan will jump to that extension. Notice that the "1" extension will call Alice’s softphone, and the "2" extension will call Bob’s softphone.
Once the above configuration is in place, you can reload the dialplan and place a test call to your PSTN phone number. You should hear Asterisk say "hello," and you should be able to dial one of the extensions and have the phone on the other end ring.
Outbound dialplan configuration
Being able to place inbound calls is great, but most businesses expect outbound calling functionality as well. Luckily, this is fairly easy to configure.
First, recall from the previous article about intra-office calling that outbound calls for Alice and Bob’s phones enter the dialplan in the office-phones context. Therefore, we need a way to match all outbound calls in this context and send them to the upstream provider.
Until now, you’ve seen extensions configured as exact matches. Extension 1001 matches and dials Alice, extension 1002 matches and dials Bob, and the extension for your inbound DID matches and allows the caller to input a selection. It would obviously be impractical to match every single possible outbound number that a user might dial. Thankfully, Asterisk provides a way to perform pattern matching.
To provide outbound calling for American numbers—e.g., (123) 456-7890—my office-phones context looks like this:
[office-phones]

exten => 1001,1,Dial(PJSIP/alice-softphone)

exten => 1002,1,Dial(PJSIP/bob-softphone)

exten => 9000,1,Answer()
same => n,Playback(hello-world)
same => n,Hangup()

exten => _XXXXXXXXXX,1,Set(CALLERID(all)="Anthony Critelli <1234567890>")
same => n,Dial(PJSIP/${EXTEN}@voipms)
If you already took a look at the Asterisk wiki’s linked pattern matching documentation, this syntax will look familiar. The outbound extension matches _XXXXXXXXXX, which is a fancy way of saying: "Match a sequence of 10 digits." The underscore indicates that this character is the beginning of a pattern match, similar to the use of the forward-slash (/) in many programming languages to indicate the use of a regular expression. Therefore, this extension will match any 10-digit extension that I send to it, such as standard 10-digit US phone numbers. A more complete example would also account for country codes, local calling, and other considerations. That is an exercise left up to the reader.
The first priority in this extension sets the CALLERID to a string of my choosing. You should replace the name and number with your own name and DID. This practice also introduces another concept in the Asterisk dialplan: The use of variables. In the configuration above, both CALLERID and EXTEN are variables that you have available to manipulate.
The second, and final, priority in the extension simply sends the call to the upstream provider via the PJSIP channel driver. This syntax is pretty straightforward, and it looks a lot like the dialplan that you already wrote to allow two phones to call each other.
With this configuration in place, you can reload your dialplan and try placing a test outbound call from Alice or Bob’s phone. Assuming that everything went well, your call should succeed.
Wrapping up
If you’ve stuck with me from the beginning, then you have successfully implemented a basic phone system using the open source Asterisk PBX. You’ve come a long way. From understanding VoIP and Asterisk basics to installing and configuring Asterisk from scratch, you should now have an idea of how to configure a simple phone system. Minimally, I hope this series has sparked your interest in learning more about telephony and Asterisk.
If you want to continue your VoIP and Asterisk journey, then I recommend that you check out these resources:
- The official Asterisk documentation is invaluable when learning about, configuring, and troubleshooting Asterisk.
- Asterisk: The Definitive Guide is an excellent and comprehensive introduction to all of the features of Asterisk.
- Videos from AstriCon, the Asterisk Users Conference, may help to spark some ideas about telephony projects.
- The Wireshark packet analysis tool has a trove of utilities for analyzing phone calls. These include call ladders, traffic analysis, and even media playback.
- Finally, if you are interested in understanding the fundamental protocols that support VoIP networks, you should review the IETF RFCs for a technical deep-dive. There are tons of VoIP-related RFCs, but the SIP, SDP, and RTP/RTCP RFCs are good starting points.
Want more on networking and connectivity topics? Check out the Linux networking cheat sheet.
About the author
Anthony Critelli is a Linux systems engineer with interests in automation, containerization, tracing, and performance. He started his professional career as a network engineer and eventually made the switch to the Linux systems side of IT. He holds a B.S. and an M.S. from the Rochester Institute of Technology.
More like this
Why Red Hat partners are the ultimate telco business asset
Reinventing the industrial edge: How Red Hat and Schneider Electric are modernizing OT
Infrastructure At The Edge | Compiler
Operating System Management | Compiler
Browse by channel

Automation
The latest on IT automation for tech, teams, and environments

Artificial intelligence
Updates on the platforms that free customers to run AI workloads anywhere

Open hybrid cloud
Explore how we build a more flexible future with hybrid cloud

Security
The latest on how we reduce risks across environments and technologies

Edge computing
Updates on the platforms that simplify operations at the edge

Infrastructure
The latest on the world’s leading enterprise Linux platform

Applications
Inside our solutions to the toughest application challenges
Virtualization
The future of enterprise virtualization for your workloads on-premise or across clouds