
It was a cold autumn afternoon in 2019 and I sat behind my work desk with a cup of steaming hot tea after a discussion with my manager. I had finally decided to take the initiative in planning the migration of a global production website from a single virtual machine to the cloud. I already had experience with Nginx and Apache as the virtual machine administrator. The second part of my job description was the development of the website features in PHP. I knew that understanding the requirements from both developer and administrator perspectives would be important to my approach to deploying a WordPress developer stack on OpenShift. My motivation as a young person was to explore and learn new technologies while doing my first experiments in a safe sandbox environment.
[ You might also like: Learn OpenShift with Minishift ]
I was aware that before working with OpenShift in a production environment, I needed to have a solid understanding of the product components and how they interact with each other. In the upcoming weeks, I spent time preparing for the Red Hat OpenShift Administration II exam and looking for answers to my questions from OpenShift architects if required.
When I wasn't studying for the exam, I looked at OpenShift 4 product features. I could see that, for a global website, many of those features are very important and would make my developing experience much easier. Here are a few of the benefits:
- High availability
- Automating scaling
- Application management
- Lightweight operating system
Configuration and deployment of applications
Here are a few notes to keep in mind:
- In this article, I don't go through selecting a hosting service or OpenShift 4 installation steps.
- The source code and database used in this guide are samples and do not reflect or use data from any production website.
- This guide comes from my personal experience while working with the tools mentioned below.
- If your OpenShift cluster is publicly accessible, instead of Docker-based build config, you can use the Source-based build config instead.
1) Cloud IDE - Red Hat CodeReady
Note: I am using this document as a reference.
Prerequisites:
- cluster-admin role
Steps:
Create a new project:
$ oc new-project wordpress-deployOn the left dashboard menu, click on the Operators tab and navigate to the OperatorHub tab. Change Project at the left top side of the page to wordpress-deploy project. Choose Red Hat CodeReady Workspaces and click on the Install button. On the Install Operator page, select Pick an existing namespace and make sure that wordpress-deploy namespace is selected. Finally, click on the Install button.

After installation, continue by clicking on the View Operator button. Under Provided APIs, click on Create Instance.
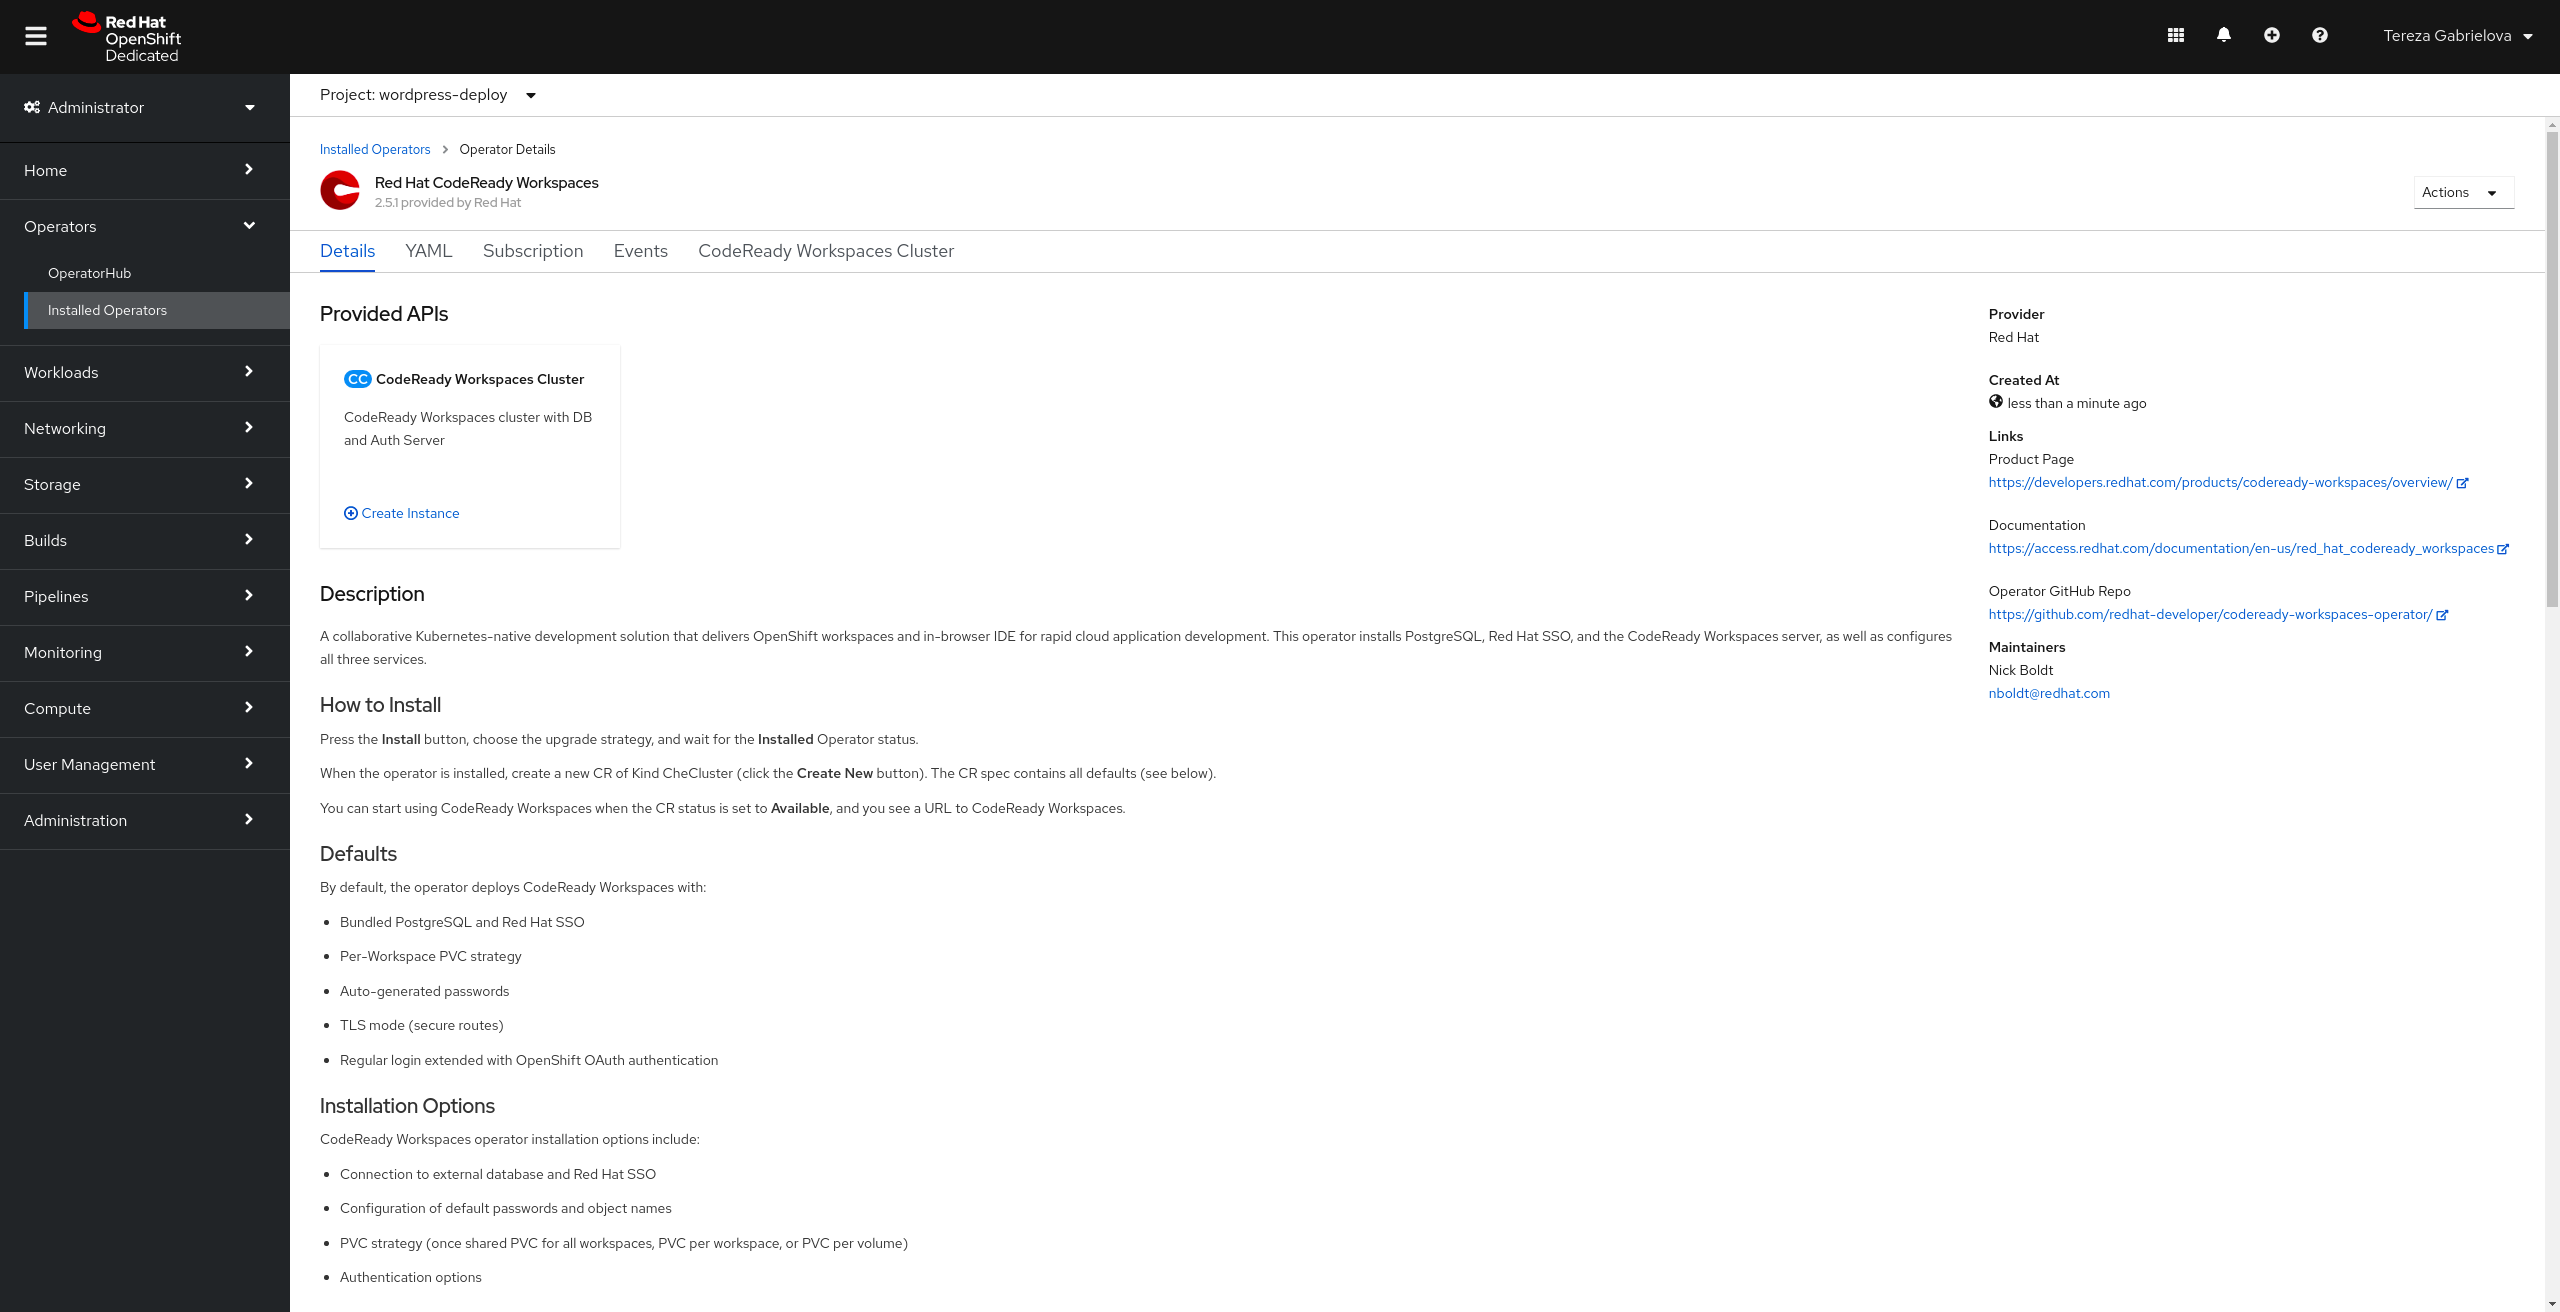
On the Create CheCluster page, keep settings default and click on the Create button.
Verify installation of the Red Hat CodeReady Workspaces Operator:
$ oc get csv -n wordpress-deploy
NAME                                  DISPLAY                        VERSION   REPLACES   PHASE
crwoperator.v2.4.0   Red Hat CodeReady Workspaces   2.4.0                Succeeded
Verify that all pods are in the Running state and Ready. To track the installation progress, follow the operator logs. Please note that the Route will not be ready until logs from the operator pod show "CodeReady Workspaces is now available at http://xyz.org". It might take a few minutes.
$ oc get pods -n wordpress-deploy
NAME                                  READY   STATUS    RESTARTS   AGE
codeready-5d7b8f64d6-2rzkm            1/1     Running     0          60s
codeready-operator-5bc96f8c5f-c7hbt   1/1     Running     0          7m56s
devfile-registry-786f455b84-t45l8     1/1     Running     0          2m8s
keycloak-688b5d48f5-mgqn4             1/1     Running     0          2m41s
plugin-registry-8fb66b5cb-9kw8q       1/1     Running     0          99s
postgres-785f5864b-mmlpx              1/1     Running     0          5m1s

$ oc logs codeready-operator-5bc96f8c5f-c7hbt -f
...
time="2020-10-28T14:29:29Z" level=info msg="CodeReady Workspaces is now available at: https://codeready-wordpress-deploy.apps.tgabriel-test.y2pm.s1.devshift.org"
...
Retrieve codeready route:
$ oc get route -n wordpress-deploy | grep codeready
NAME HOST/PORT PATH SERVICES PORT TERMINATION WILDCARD
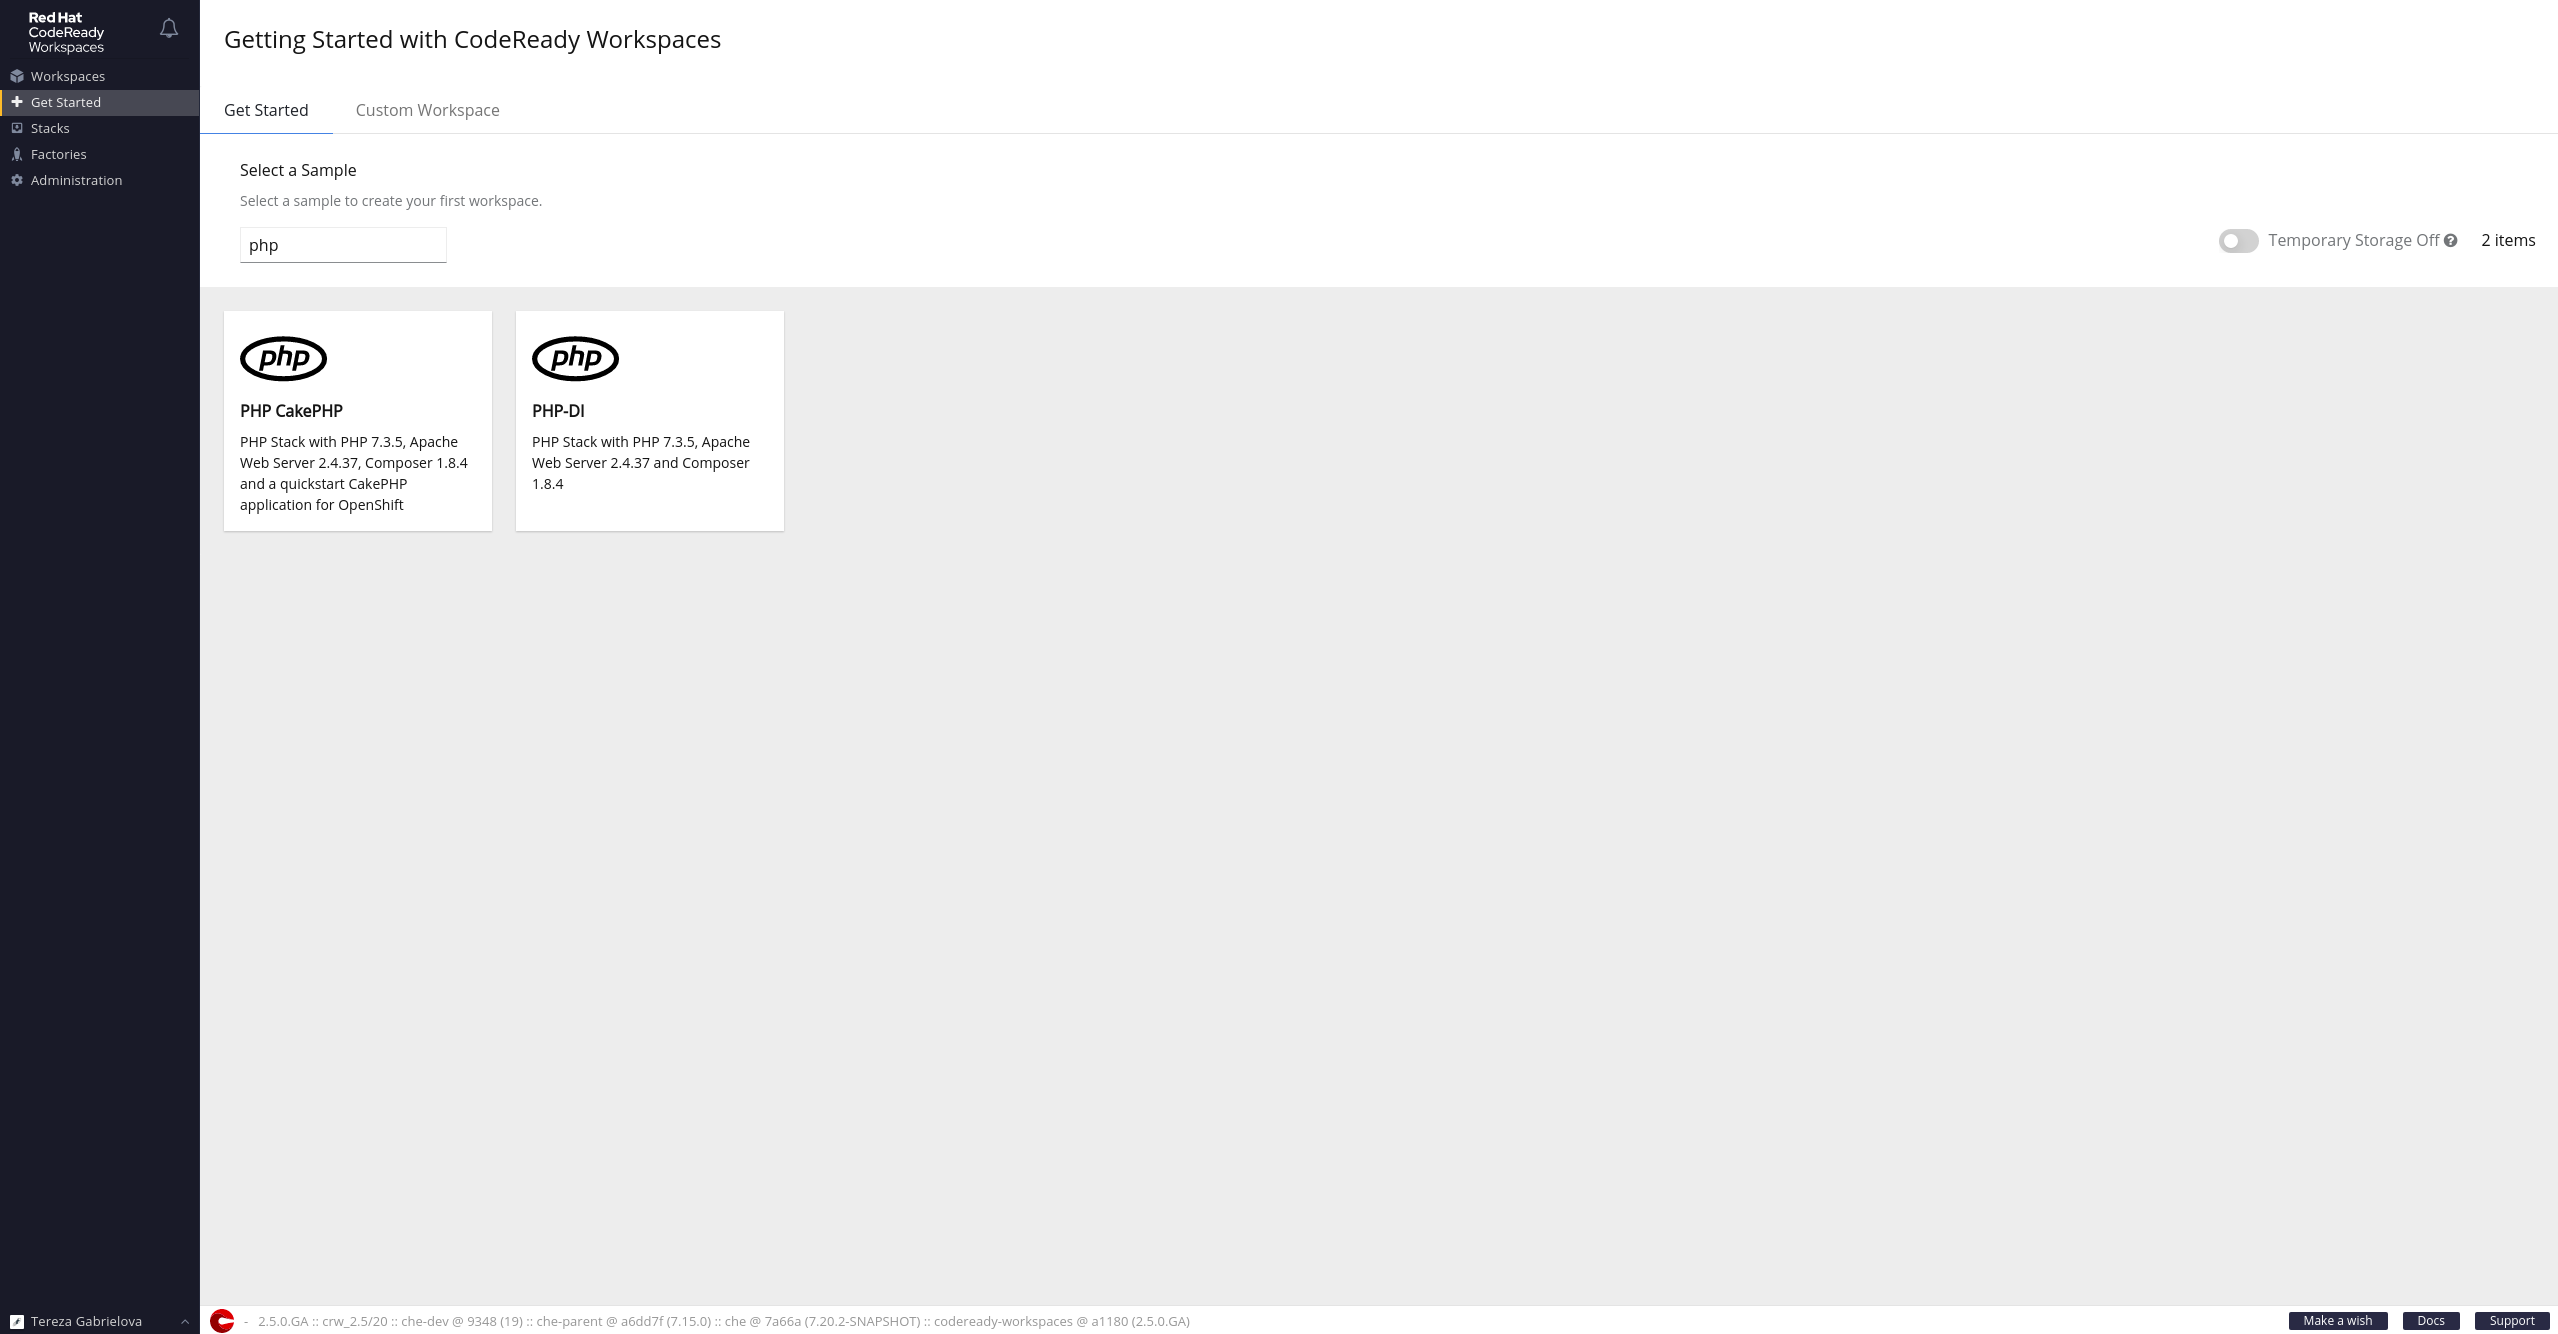
codeready codeready-wordpress-deploy.apps.tgabriel-test.y2pm.s1.devshift.org che-host 8080 edge/Redirect NoneVisit codeready route and update your Account Information. Under the Get Started tab, select the PHP CakePHP stack.

Verify that the Red Hat CodeReady Workspace has been created:

2) CI/CD part 1 - Install Tekton CLI and OpenShift Pipelines
Note: As a reference, I am using this openshift/pipelines-tutorial. If you are interested you can check the High-level concepts of OpenShift Pipelines. For my case, I chose Tekton but feel free to use Jenkins, CircleCI, or any other pipeline tool preferred by you or your company.
Tekton is a powerful yet flexible Kubernetes-native open-source framework for creating continuous integration and continuous delivery (CI/CD) systems. It lets you build, test, and deploy across multiple cloud providers or on-premises systems by abstracting away the underlying implementation details. Tekton Pipelines 2020 Roadmap.
Steps:
Install Tekton CLI (tkn) from here as per the readme file in the repository.
Install OpenShift Pipelines Operator.
Verify installation of Tekton CLI and Pipelines Operator:
$ tkn version
Client version: 0.13.1
$ oc get csv -n wordpress-deploy
NAME                                  DISPLAY                        VERSION   REPLACES   PHASE
crwoperator.v2.4.0                    Red Hat CodeReady Workspaces   2.4.0                Succeeded
openshift-pipelines-operator.v1.0.1   OpenShift Pipelines Operator   1.0.1                Succeeded
3) Apply custom template which creates application pods
Note: I used sample source code from the Github repository.
Steps:
Download the template file using curl command:
$ curl -O https://raw.githubusercontent.com/Tessg22/making-a-wordpress-developer-stack-on-openshift-4/master/deploy/openshift-template.yamlUpload the template to your namespace:
$ oc create -f openshift-template.yamlBefore creating the application, first list required variables for the template:
$ oc process --parameters wordpress-nginx-php
NAME                        DESCRIPTION                                                                  GENERATOR           VALUE
NAME                        The name assigned to all of the frontend objects defined in this template.   expression          wordpress-[a-f0-9]{6}
NAMESPACE                   The OpenShift Namespace where the ImageStream resides.
APP_MEMORY_LIMIT            Maximum amount of memory limits the App container can use.                                       512Mi
APP_CPU_LIMIT               Maximum amount of cpu limits the App container can use.                                          200m
APP_MEMORY_REQUEST          Maximum amount of memory requests the App container can use.                                     512Mi
APP_CPU_REQUEST             Maximum amount of cpu requests the App container can use.                                        200m
DB_MEMORY_LIMIT             Maximum amount of memory limits the MariaDB container can use.                                   512Mi
DB_CPU_LIMIT                Maximum amount of cpu limits the MariaDB container can use.                                      200m
DB_MEMORY_REQUEST           Maximum amount of memory requests the MariaDB container can use.                                 512Mi
DB_CPU_REQUEST              Maximum amount of cpu requests the MariaDB container can use.                                    200m
DB_VOLUME_CAPACITY          Volume space available for DB data, e.g. 512Mi, 2Gi                                              1Gi
FILES_VOLUME_CAPACITY       Volume space available for sites/default/files, e.g. 512Mi, 2Gi                                  1Gi
ROUTER_CANONICAL_HOSTNAME   Clusters Router Canonical Hostname is self-explanatory.
MYSQL_DATABASE                                                                                                               wordpress
MYSQL_USER                                                                                                                   wordpress
MYSQL_ROOT_PASSWORD         Password for the MySQL root user.                                            expression          [a-zA-Z0-9]{16}
MYSQL_PASSWORD                                                                                           expression          [a-zA-Z0-9]{16}
Process the provided template including your parameter values:
$ oc process wordpress-nginx-php -p NAME=wordpress -p NAMESPACE=wordpress-deploy -p ROUTER_CANONICAL_HOSTNAME=apps.tgabriel-test.y2pm.s1.devshift.org -p MYSQL_ROOT_PASSWORD=nKatIcTRIToR -p MYSQL_PASSWORD=eSoiDenThicO | oc create -f -Verify that all pods are in the Running or Completed state:
$ oc get pods -n wordpress-deploy
NAME                                                    READY   STATUS      RESTARTS   AGE
codeready-5dc8dcd6f8-xm6tx                              1/1     Running     0          69m
codeready-operator-864446f6b-dpp52                      1/1     Running     0          74m
keycloak-7c4f96b7d9-m6nv9                               1/1     Running     0          72m
phpmyadmin-1-build                                      0/1     Completed   0          11m
phpmyadmin-1-deploy                                     0/1     Completed   0          3m36s
phpmyadmin-1-fmt7b                                      1/1     Running     0          3m28s
postgres-769b855b45-tlhcs                               1/1     Running     0          73m
wordpress-app-1-build                                   0/1     Completed   0          11m
wordpress-app-1-25p6n                                   2/2     Running     0          2m28s
wordpress-app-1-7mc4z                                   2/2     Running     0          2m28s
wordpress-app-1-deploy                                  0/1     Completed   0          2m43s
4) CI/CD part 2 - Run Tekton pipeline
Steps:
Check the list of created resources:
$ tkn resource ls
NAME              TYPE    DETAILS
app-git         git         url: https://github.com/Tessg22/making-a-wordpress-developer-stack-on-openshift-4
app-image   image   url: image-registry.openshift-image-registry.svc:5000/wordpress-deploy/openshift-nginx-phpfpm-s2i
$ tkn task ls
NAME               AGE
openshift-client   58 seconds ago
s2i-php            1 minute ago
$ tkn pipeline ls
NAME                   AGE                 LAST RUN                                                              STARTED         DURATION   STATUS
build-and-deploy  3 minutes ago   openshift-nginx-phpfpm-deploy-pipelinerun-vt7cf  3 minutes ago   1 minutes      Succeeded
Monitor the Tekton pipeline:
$ tkn pipeline logs -f
...
[deploy : oc] build.build.openshift.io/wordpress-2 started
...
For starting a new pipeline run:
$ tkn pipeline start build-and-deploy-2 -w name=shared-workspace,volumeClaimTemplateFile=https://raw.githubusercontent.com/openshift/pipelines-tutorial/master/01_pipeline/03_persistent_volume_claim.yaml -p deployment-name=wordpress -r app-git=app-git -r app-image=app-image -s pipeline5) Import of the sample production data using CLI
Note: Due to the large size of our exported database file, we will be proceeding using CLI commands. Please note that by utilizing the Phpmyadmin import tool, you would get a 504 Gateway Time-out error due to the limits of the Phpmyadmin import.
Steps:
Get inside the DB pod container:
$ oc get pods -n wordpress-deploy
NAME                        READY   STATUS       RESTARTS   AGE
phpmyadmin-1-build          0/1     Completed    0          19h
phpmyadmin-1-deploy         0/1     Completed    0          19h
phpmyadmin-1-fjhfn          1/1     Running      0          19h
wordpress-app-1-8jtzg       2/2     Running      0          19h
wordpress-app-1-build       0/1     Completed    0          19h
wordpress-app-1-deploy      0/1     Completed    0          19h
wordpress-app-1-ks48k       2/2     Running      0          19h
wordpress-app-db-1-bcmnn    1/1     Running      0          19h
wordpress-app-db-1-build    0/1     Completed    0          19h
wordpress-app-db-1-deploy   0/1     Completed    0          19h
$ oc rsh wordpress-app-db-1-bcmnn
sh-4.2$
Import the backup file using the CLI:
sh-4.2$ curl -O https://raw.githubusercontent.com/Tessg22/making-a-wordpress-developer-stack-on-openshift-4/master/deploy/database_backup.sql
sh-4.2$ mysql -h 127.0.0.1 -u root -D wordpress < database_backup.sql
(Optional) Inside of the wp_options table, edit siteurl and home values corresponding to your application path.
Get the WordPress application route:
$ oc get route wordpress-app
NAME HOST/PORT PATH SERVICES PORT TERMINATION WILDCARD
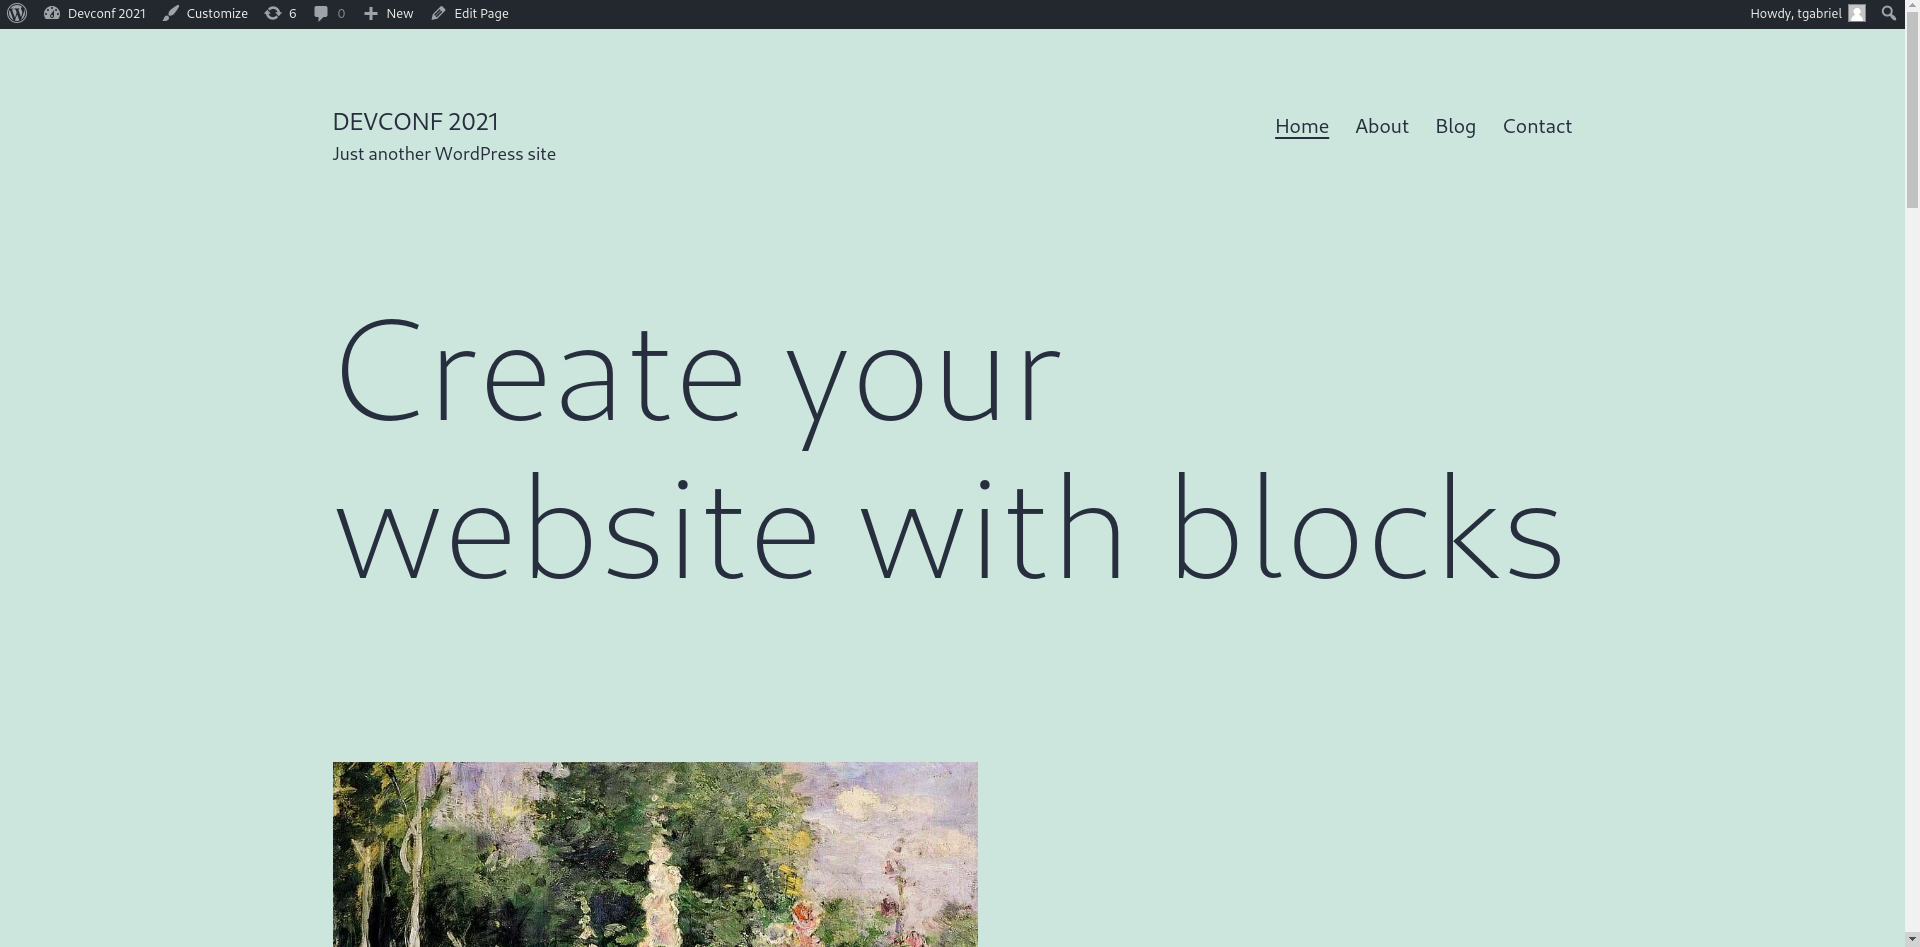
wordpress-app wordpress-app-wordpress-deploy.apps.tgabriel-test.y2pm.s1.devshift.org wordpress-app <all> NoneVisit the application route, where you should see the application Home Page.
[ Get this free ebook: Managing your Kubernetes clusters for dummies. ]
Wrap up
This guide provides a good starting point for creating your WordPress developer stack on OpenShift 4 and prepares you for a successful configuration.
Resources and credits
About the author
After her studies, Tereza has worked in multiple fields before she could find her passion for programming and operations. The situations together with great mentors and leaders around her helped to shape her career path towards becoming a Site Reliability Engineer supporting dozens of customers of the OpenShift Dedicated platform.
Tereza is an open culture advocate and is interested in projects to solve global environmental problems and finding solutions for renewable energy.
More like this
How Red Hat solves the toughest challenges in agentless infrastructure scanning
Satellite 6.19 delivers Red Hat Lightspeed on premise security monitoring
Infrastructure At The Edge | Compiler
Operating System Management | Compiler
Browse by channel

Automation
The latest on IT automation for tech, teams, and environments

Artificial intelligence
Updates on the platforms that free customers to run AI workloads anywhere

Open hybrid cloud
Explore how we build a more flexible future with hybrid cloud

Security
The latest on how we reduce risks across environments and technologies

Edge computing
Updates on the platforms that simplify operations at the edge

Infrastructure
The latest on the world’s leading enterprise Linux platform

Applications
Inside our solutions to the toughest application challenges
Virtualization
The future of enterprise virtualization for your workloads on-premise or across clouds