
In my previous series, I discussed how to run Osquery and schedule queries to interrogate systems for useful information. Those articles demonstrated the power of using Osquery by itself. However, the real value of Osquery comes from having a central control plane to manage Osquery agents and aggregate query results.
There are many ways to accomplish this. You can centralize configurations using your preferred configuration management utility, such as Ansible. You can also aggregate logs using your favorite aggregation tool because Osquery logs to a file and is unopinionated about the upstream logging infrastructure.
[ Want to test your sysadmin skills? Take a skills assessment today. ]
In this article, I discuss an integrated approach using FleetDM. FleetDM is an open source tool that centralizes configuration and query management for a fleet of Osquery agents. Using the FleetDM user interface (UI) or command-line interface (CLI), you can easily submit and schedule queries across all of your Osquery agents, filtering them as needed.
Install FleetDM
A production FleetDM server installation has several infrastructure components. The primary database is MySQL, Redis provides a queue, and public key infrastructure (PKI) provides certificates for the FleetDM installation. You can also send Osquery logs to a central location, allowing FleetDM to merge the logs and then forward them to your central logging infrastructure.
For these articles, I'm using a simple Docker Compose file. This file is not suitable for production, as none of the components are highly available. However, it provides the basic infrastructure needed to explore FleetDM and understand its capabilities.
services:
  mysql:
    image: mysql:latest
    command: '--default-authentication-plugin=mysql_native_password'
    volumes:
      - mysql:/var/lib/mysql
    restart: always
    environment:
      - MYSQL_ROOT_PASSWORD=fleet123
      - MYSQL_DATABASE=fleet
      - MYSQL_USER=fleet
      - MYSQL_PASSWORD=fleet123
    expose:
      - 3306
  redis:
    image: redis:latest
    volumes:
      - redis:/data
    expose:
      - 6379
  fleet_oneshot:
    image: fleetdm/fleet:latest
    command: 'fleet prepare db'
    restart: 'no'
    environment: &fleet_environment
      - FLEET_MYSQL_ADDRESS=mysql:3306
      - FLEET_MYSQL_DATABASE=fleet
      - FLEET_MYSQL_USERNAME=root
      - FLEET_MYSQL_PASSWORD=fleet123
      - FLEET_REDIS_ADDRESS=redis:6379
      - FLEET_SERVER_CERT=/fleet/server.cert
      - FLEET_SERVER_KEY=/fleet/server.pem
      - FLEET_OSQUERY_POLICY_UPDATE_INTERVAL=30s
  fleet:
    image: fleetdm/fleet:latest
    volumes:
      - type: bind
        source: ./fleet
        target: /fleet
    environment: *fleet_environment
    ports:
      - "8080:8080"
    depends_on:
      fleet_oneshot:
        condition: service_completed_successfully
volumes:
  mysql:
  redis:
Before bringing up the environment, you must generate a TLS certificate for the FleetDM server. A self-signed certificate is sufficient for experimenting with FleetDM.
Use a certificate assigned by a public certificate authority (CA), such as LetsEncrypt, or an appropriate CA for your organization in a production installation.
[ Check out this guide to boosting hybrid cloud security and protecting your business. ]
Create self-signed SSL certificates
First, create a directory, which will be mounted inside the FleetDM container:
$ mkdir fleet
Next, create a private key using OpenSSL:
$ openssl ecparam -name prime256v1 \
-genkey -noout -out fleet/server.pem
Create a public key:
$ openssl ec -in fleet/server.pem \
-pubout -out fleet/server.pem.pub
read EC key
writing EC key
Generate a self-signed certificate for fleet.example.com:
$ openssl req -new -x509 \
-key fleet/server.pem \
-out fleet/server.cert -days 365
After this command, you're prompted to enter information for your certificate request. Enter whatever information you want to use in your test environment.
Finally, change the user ID (UID) and group ID (GID) of the certificate files to be owned by the appropriate UID and GID within the container:
$ sudo chown 100:101 fleet/
[ Dive into contaniers by downloading the Podman in Action eBook. ]
Start the environment
Once the certificate is in place, bring up the Docker Compose environment:
$ docker-compose up
Creating network "fleetdm_default" with the default driver
Creating volume "fleetdm_mysql" with default driver
Creating volume "fleetdm_redis" with default driver
Creating fleetdm_fleet_oneshot_1 ... done
Creating fleetdm_redis_1         ... done
Creating fleetdm_mysql_1         ... done
Creating fleetdm_fleet_1         ... done
This example is a simple lab environment that uses fake domains, such as fleet.example.com, so you must add an entry to /etc/hosts so that you can communicate with the FleetDM server:
127.0.0.1   localhost localhost.localdomain localhost4 localhost4.localdomain4
::1         localhost localhost.localdomain localhost6 localhost6.localdomain6
127.0.0.1 fleet.example.com
After a few minutes, FleetDM is accessible at https://fleet.example.com:8080. The initial set of prompts asks you to set up a basic configuration, such as a superuser account and information about your organization.
The third page of the setup is the most important. It prompts you to specify the web address that FleetDM uses. I'm using fleet.example.com in this lab environment:
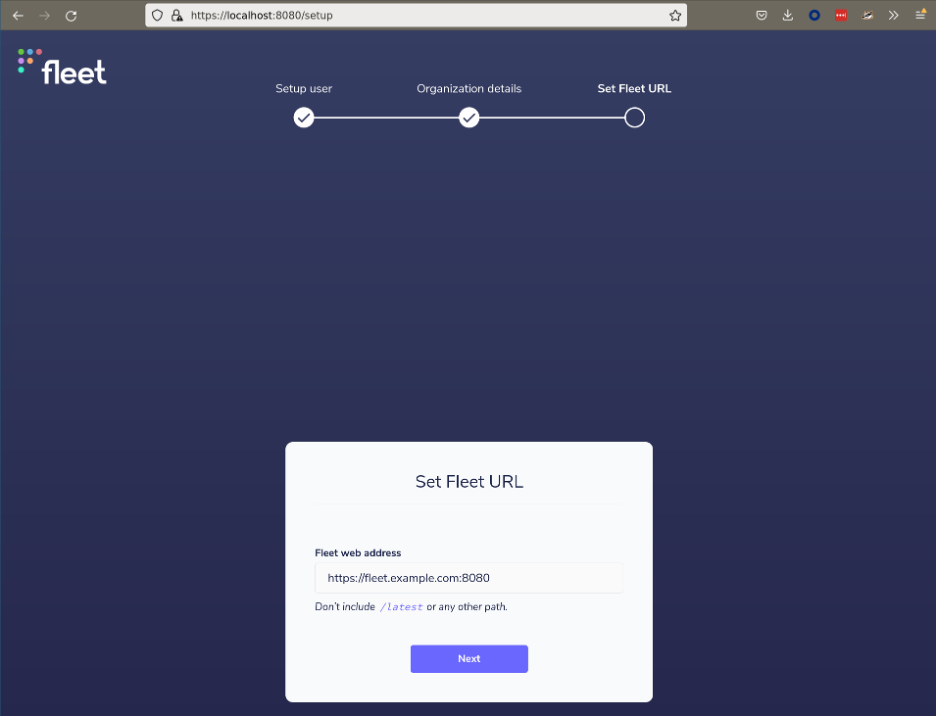
You now have a functional FleetDM server. Take some time to navigate the UI and become comfortable with the overall interface.
Install a client
Once the FleetDM server is operational, you must add some Osquery hosts for it to manage. FleetDM provides two different options for adding managed hosts. You can generate a custom FleetDM installer that includes an embedded version of Osquery, or you can configure an existing Osquery installation to connect with FleetDM.
I will cover both methods.
Generate a custom installer
First, you can use the FleetDM command line to generate a custom installer with all the necessary configurations to work with FleetDM. This is the easiest method because it removes any concern about misconfiguration. Simply distribute the generated installer using your automation tool of choice, such as Ansible, and hosts automatically register with FleetDM.
Building a FleetDM installer requires the fleetctl command. Releases are available on GitHub as a single binary, and you can easily install them from the command line:
$ wget https://github.com/fleetdm/fleet/releases/download/fleet-v4.24.0/fleetctl_v4.24.0_linux.tar.gz \
-o /dev/null

$ tar -xf fleetctl_v4.24.0_linux.tar.gz

$ mv fleetctl_v4.24.0_linux/fleetctl ~/.local/bin/
Once you have installed fleetctl, generate an installer package by navigating to the Hosts > Add hosts > Advanced page. First, download your server's certificate using the Download button. Next, run the necessary fleetctl command to generate the installer:
$ fleetctl package --type=rpm \
--fleet-url=https://fleet.example.com:8080 \
--enroll-secret=Os3Oh9jDkNKtTWZV+OsRHuSLc2utNbGb \
--fleet-certificate=fleet.pem
Downloading the certificate isn't necessary for a production environment that uses a certificate signed by a trusted CA.
You can transfer the installer to a host that you want to manage and install it using the system package manager:
$ sudo dnf install -y ./fleet-osquery-1.3.0.x86_64.rpm
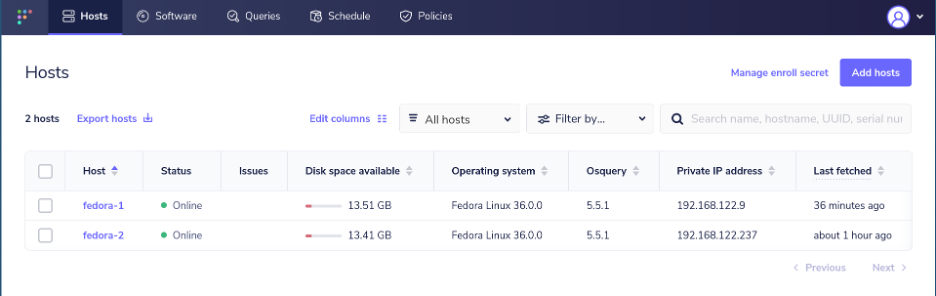
After a few minutes, the host appears on the Hosts page in the FleetDM interface.
Configure an Osquery installation
The second approach for connecting a host with FleetDM is configuring an existing Osquery installation. The first article in my Osquery series discussed how to install Osquery, and this provides a starting point for FleetDM.
Navigate to the Hosts > Add hosts > Advanced page and download the CA certificate for the FleetDM instance. You must also download the enroll secrets file and the flags file. The enroll secret contains a token used by Osquery to enroll with the FleetDM server. The flags file contains startup flags that are passed to the Osquery binary when it runs.
Transfer these files to a host with Osquery already installed, and place them in /etc/osquery. The exact path and name of the flags file vary by operating system. Consult the systemd unit file for Osquery to understand the required location. On Fedora, the flags file is /etc/osquery/osquery.flags.
You must also edit the flags file to specify the correct, full path to the enrollment secret file and the CA certificate. Once all of these parameters are in place, you can restart Osquery to pick up the changes:
$ ls /etc/osquery
fleet.pem  osquery.flags  secret.txt

$ grep -E 'tls_server_certs|enroll_secret_path' \
/etc/osquery/osquery.flags \
--tls_server_certs=/etc/osquery/fleet.pem \
--enroll_secret_path=/etc/osquery/secret.txt

$ sudo systemctl restart osqueryd
All of the hosts communicating with the FleetDM server appear on the Hosts page:
Wrap up
In this article, you learned how to set up a basic FleetDM server for non-production use and connect hosts to the FleetDM environment. You saw how FleetDM could build a custom installer to ease the management of Osquery deployment, or it can be configured to work with an existing Osquery installation.
Now that you have created this basic example, you can begin using FleetDM to run and schedule queries across your environment. The next article in this series covers query management, including ad-hoc and scheduled queries.
[ Learn how to manage your Linux environment for success. ]
About the author
Anthony Critelli is a Linux systems engineer with interests in automation, containerization, tracing, and performance. He started his professional career as a network engineer and eventually made the switch to the Linux systems side of IT. He holds a B.S. and an M.S. from the Rochester Institute of Technology.
More like this
The evolution of infrastructure automation in the age of AI: 4 key takeaways from Red Hat Summit 2026
Govern privileged workload boundaries with Red Hat OpenShift, Ansible Automation Platform, and Identity Management
Untangling Networks | Compiler
Operating System Management | Compiler
Browse by channel

Automation
The latest on IT automation for tech, teams, and environments

Artificial intelligence
Updates on the platforms that free customers to run AI workloads anywhere

Open hybrid cloud
Explore how we build a more flexible future with hybrid cloud

Security
The latest on how we reduce risks across environments and technologies

Edge computing
Updates on the platforms that simplify operations at the edge

Infrastructure
The latest on the world’s leading enterprise Linux platform

Applications
Inside our solutions to the toughest application challenges
Virtualization
The future of enterprise virtualization for your workloads on-premise or across clouds