
Many sysadmins view networking as one of the most complex elements in a Kubernetes environment. This is especially true when hosting your own Kubernetes cluster instead of paying for a managed cluster.
Accommodating a microservices paradigm where services rely heavily on the network for communication requires extensive knowledge of networking fundamentals. While very basic network skills are part of every sysadmin's toolbox, it's rarer for systems administrators to have a deep understanding of networking. This makes it harder to reason about the complex network topologies that typically accompany a Kubernetes environment.
In this series of articles, I will take you through different layers of the Kubernetes network stack to see how containers, pods, and nodes communicate. These articles will focus on digging into the concepts by using tools such as packet captures to truly understand the traffic that traverses the wire.
While a deep understanding is rarely needed to operate the average Kubernetes cluster, this knowledge can better position you to maintain and troubleshoot workloads running in Kubernetes.
Pod networking basics
The basic unit of work in a Kubernetes cluster is a pod, which provides an ideal starting point for understanding Kubernetes networking. A pod consists of one or more containers that share certain namespaces.
It may seem strange that a pod contains multiple containers, but this approach is fairly common. For example, an init container can run to perform setup for a workload before the application container starts. This setup may consist of fetching secrets from a secret store or doing other runtime configurations that can't be easily baked into a container image. This approach is also common in service meshes where a sidecar container runs next to the application container to provide advanced network functionality.
[ Learn how to manage your Linux environment for success. ]
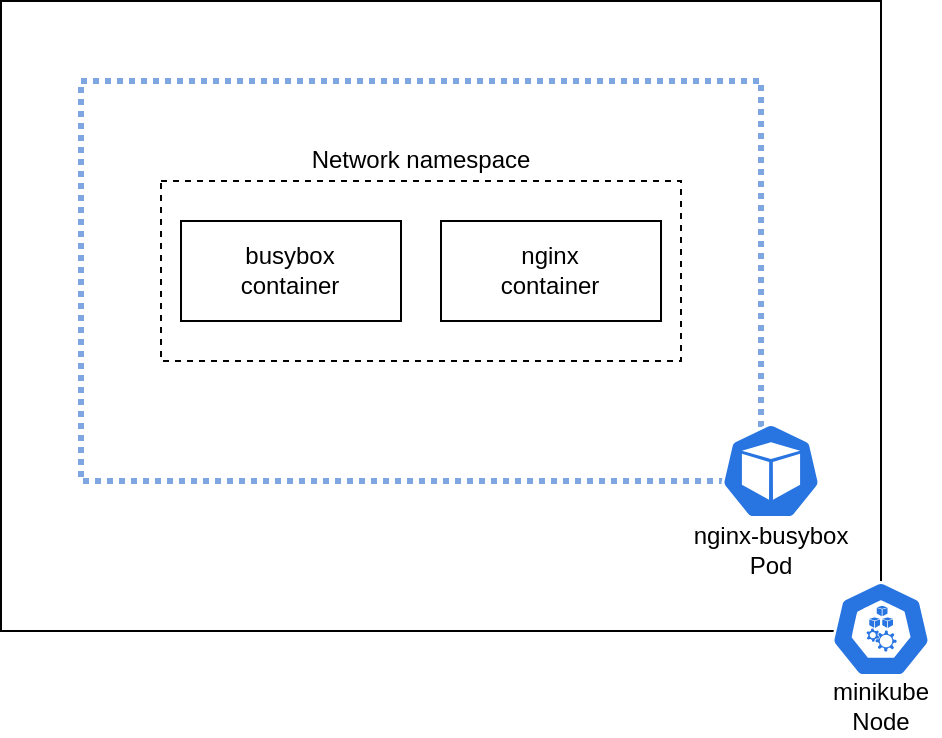
From a network standpoint, each container within the pod shares the same networking namespace. This gives each container access to the same network resources, such as the pod's IP address. Containers within the same pod can also communicate with each other over localhost.
To better understand how this works in practice, I will fire up a few pods and inspect their network stack.
A multi-container pod
This article uses minikube to quickly build a cluster for testing. In case you haven't used minikube before, it's easy to install. A single-node cluster with the default configuration is sufficient for this experiment:
$ minikube start
😄  minikube v1.25.2 on Ubuntu 20.04
✨  Automatically selected the kvm2 driver. Other choices: virtualbox, ssh
👍  Starting control plane node minikube in cluster minikube
🔥  Creating kvm2 VM (CPUs=2, Memory=3900MB, Disk=20000MB) ...
🐳  Preparing Kubernetes v1.23.3 on Docker 20.10.12 ...
    ▪ kubelet.housekeeping-interval=5m
    ▪ Generating certificates and keys ...
    ▪ Booting up control plane ...
    ▪ Configuring RBAC rules ...
🔎  Verifying Kubernetes components...
    ▪ Using image gcr.io/k8s-minikube/storage-provisioner:v5
🌟  Enabled addons: default-storageclass, storage-provisioner
🏄  Done! kubectl is now configured to use "minikube" cluster and "default" namespace by default
[ Cheat sheet: Get a list of Linux utilities and commands for managing servers and networks. ]
To understand how containers within a pod communicate, you need a pod with multiple containers. This article uses a simple pod with two containers: Nginx and BusyBox. The Nginx container serves a default web page, and the BusyBox container sleeps indefinitely:
$ cat nginx_busybox.yaml
apiVersion: v1
kind: Pod
metadata:
  name: nginx-busybox
spec:
  containers:
  - command:
    - sleep
    - infinity
    image: busybox
    name: busybox
  - image: nginx
    name: nginx

$ kubectl apply -f nginx_busybox.yaml
pod/nginx-busybox created

$ kubectl get pods
NAME            READY   STATUS    RESTARTS   AGE
nginx-busybox   2/2     Running   0          17s
Once the pod is successfully running, you can connect to it and launch a shell to look around. First, confirm that BusyBox can communicate with Nginx over localhost:
$ kubectl exec -it -c busybox nginx-busybox -- /bin/sh

/ # wget localhost -O - 2>/dev/null
<!DOCTYPE html>
<html>
<head>
<title>Welcome to nginx!</title>
<style>
html { color-scheme: light dark; }
body { width: 35em; margin: 0 auto;
font-family: Tahoma, Verdana, Arial, sans-serif; }
</style>
</head>
<body>
<h1>Welcome to nginx!</h1>
<p>If you see this page, the nginx web server is successfully installed and
working. Further configuration is required.</p>

<p>For online documentation and support please refer to
<a href="http://nginx.org/">nginx.org</a>.<br/>
Commercial support is available at
<a href="http://nginx.com/">nginx.com</a>.</p>

<p><em>Thank you for using nginx.</em></p>
</body>
</html>
Nginx is accessible over localhost and is serving a default page. Examining the netstat output confirms that something is listening on port 80. However, the BusyBox container can't see the process ID of the running process:
/ # netstat -tnlp
Active Internet connections (only servers)
Proto Recv-Q Send-Q Local Address           Foreign Address         State       PID/Program name
tcp        0      0 0.0.0.0:80              0.0.0.0:*               LISTEN      -
tcp        0      0 :::80                   :::*                    LISTEN      -
The process ID isn't visible because the BusyBox container runs in a different process namespace from the Nginx container. However, you can launch a shell in the Nginx container and view the process ID (after installing netstat in the container):
$ kubectl exec -it -c nginx nginx-busybox -- /bin/bash
root@nginx-busybox:/# netstat -tnlp
Active Internet connections (only servers)
Proto Recv-Q Send-Q Local Address           Foreign Address         State       PID/Program name
tcp        0      0 0.0.0.0:80              0.0.0.0:*               LISTEN      1/nginx: master pro
tcp6       0      0 :::80                   :::*                    LISTEN      1/nginx: master pro
Inspecting the namespaces
So far, the article has observed aspects of the network from the containers' perspective. But what does this look like on the host? To understand the configuration of the namespaces from a host perspective, you first need to obtain the container IDs of each container within the pod:
$ kubectl get pod -o json nginx-busybox | jq .status.containerStatuses[].containerID
"docker://1d77670aebe59cdcc0f1f538e3e9e7a33b179abd1311c4230bbea69eea65eb02"
"docker://b34908dad17f3a139678520d367aa81786a2b8c74531a2b93b9c221a038b7a1e"
[ Download now: Advanced Linux commands cheat sheet. ]
Each container can then be inspected using minikube ssh to connect to the running minikube instance. Minikube uses the Docker runtime by default, and you can use standard Docker commands to obtain the containers' process IDs. These process IDs can then be passed to lsns to reveal the different namespaces where each container is running:
# Connect to minikube over SSH
$ minikube ssh
                         _             _
            _         _ ( )           ( )
  ___ ___  (_)  ___  (_)| |/')  _   _ | |_      __
/' _ ` _ `\| |/' _ `\| || , <  ( ) ( )| '_`\  /'__`\
| ( ) ( ) || || ( ) || || |\`\ | (_) || |_) )(  ___/
(_) (_) (_)(_)(_) (_)(_)(_) (_)`\___/'(_,__/'`\____)

# Obtain the process ID of each container in the pod
$ docker inspect 1d77670aebe59cdcc0f1f538e3e9e7a33b179abd1311c4230bbea69eea65eb02 | jq .[].State.Pid
4590
$ docker inspect b34908dad17f3a139678520d367aa81786a2b8c74531a2b93b9c221a038b7a1e | jq .[].State.Pid
4685

# Obtain the namespaces for each process
$ sudo lsns -p 4590
        NS TYPE   NPROCS   PID USER  COMMAND
4026531835 cgroup    124     1 root  /sbin/init noembed norestore
4026531837 user      124     1 root  /sbin/init noembed norestore
4026532463 ipc         5  4513 65535 /pause
4026532466 net         5  4513 65535 /pause
4026532573 mnt         1  4590 root  sleep infinity
4026532574 uts         1  4590 root  sleep infinity
4026532575 pid         1  4590 root  sleep infinity
$ sudo lsns -p 4685
        NS TYPE   NPROCS   PID USER  COMMAND
4026531835 cgroup    124     1 root  /sbin/init noembed norestore
4026531837 user      124     1 root  /sbin/init noembed norestore
4026532463 ipc         5  4513 65535 /pause
4026532466 net         5  4513 65535 /pause
4026532576 mnt         3  4685 root  nginx: master process nginx -g daemon off;
4026532577 uts         3  4685 root  nginx: master process nginx -g daemon off;
4026532578 pid         3  4685 root  nginx: master process nginx -g daemon off;
This output shows the configuration from the host's perspective. The containers share a network namespace (4026532466), but they run in different process namespaces (4026532575 and 4026532578). This explains why the containers within the pod can communicate with each other over localhost, but they can't see each other's process IDs.
Wrap up
The pod is the basic unit of work in a Kubernetes cluster, and understanding the general operation of its network stack is fundamental to understanding how Kubernetes workloads communicate.
While a single pod may seem like a very simple construct, this article has demonstrated that there is more going on under the hood of the Linux network stack that enables pods to function. Additionally, the ability for containers within a pod to communicate over the localhost address allows patterns like sidecar and init containers.
The next article in this series covers how pods communicate with each other across multiple Kubernetes nodes.
About the author
Anthony Critelli is a Linux systems engineer with interests in automation, containerization, tracing, and performance. He started his professional career as a network engineer and eventually made the switch to the Linux systems side of IT. He holds a B.S. and an M.S. from the Rochester Institute of Technology.
More like this
Gain stronger pod isolation on Microsoft Azure Red Hat OpenShift with OpenShift sandboxed containers
Can't patch fast enough? Zero trust as a last line of defense
Container Roundup | Compiler
The Containers_Derby | Command Line Heroes
Browse by channel

Automation
The latest on IT automation for tech, teams, and environments

Artificial intelligence
Updates on the platforms that free customers to run AI workloads anywhere

Open hybrid cloud
Explore how we build a more flexible future with hybrid cloud

Security
The latest on how we reduce risks across environments and technologies

Edge computing
Updates on the platforms that simplify operations at the edge

Infrastructure
The latest on the world’s leading enterprise Linux platform

Applications
Inside our solutions to the toughest application challenges
Virtualization
The future of enterprise virtualization for your workloads on-premise or across clouds