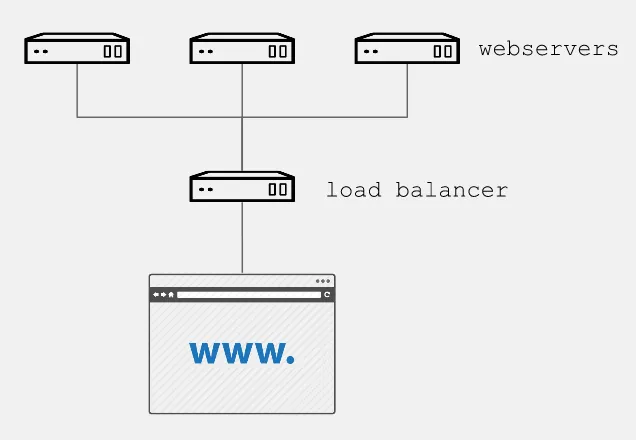
One of the key aspects of the technical account management (TAM) service is to share knowledge in order to ease the learning curve of cloud technologies for SysAdmins, in their transition to DevOps role. The best way to pave the path to DevOps, I believe, is to execute day-to-day SysAdmin management tasks using cutting-edge automation tools.
Through a practical example, we will show how to automate creation of one of the most basic web services, with three instances of Apache as a backend and a load balancer as frontend. All this will be created directly on the Google Cloud Platform.

Prerequisites
In addition to having Ansible installed in the control node, it is essential to follow the steps described in the Google Cloud Platform Guide.
We must also create a pair of RSA keys:
$ ssh-keygen -t rsa -b 4096 -f <rsa key file>In order to have our instances as subscribed with full support from Red Hat, it is necessary to move our Red Hat subscriptions from physical or on-premise systems onto certified cloud providers, in this case Google Cloud Platform. We must follow the Getting started with Red Hat Cloud Access guide, to allow your subscriptions be treated the same, regardless of the environment where you use them.
The role
For the tasks of installing, configuring, and enabling the necessary packages of each web instance, we use a simple role, which we can use on bare metal or virtual machines. In Ansible Galaxy, you can find different roles of this type, for this example, we will use a role to help us to:
Install and enable apache and firewalld
Configure apache with a start page that shows the ip of each gce instance, for example:
$ cat apache_indexhtml.j2
<!-- {{ ansible_managed }} -->
<html>
<head><title>Apache is running!</title></head>
<body>
<h1>
Hello from {{ inventory_hostname }}
</h1>
</body>
</html>
$
Open the http port (80)
Restart apache and firewalld to confirm the configuration
The playbooks
With the following playbook, we will create:
The firewall rule to allow http traffic to our instances, and
Three instances based on Red Hat Enterprise Linux 7, for the preparation of each instance, the aforementioned role will be used.
For this it is necessary to wait for the SSH port to be available, since if it is not listening, the playbook can send us an error and not execute the subsequent tasks. By default, Google Compute Engine (GCE) adds the ssh-keys of the platform itself; in our case, we must inject our previously created RSA public key to perform the post-creation tasks:
$ cat gce-apache.yml
---
- name: Create gce webserver instances
  hosts: localhost
  connection: local
  gather_facts: True

  vars:
     service_account_email: <Your gce service account email>
     credentials_file: <Your json credentials file>
     project_id: <Your project id>
     instance_names: web1,web2,web3
     machine_type: n1-standard-1
     image: rhel-7

  tasks:
  - name: Create firewall rule to allow http traffic
     gce_net:
       name: default
       fwname: "my-http-fw-rule"
       allowed: tcp:80
       state: present
       src_range: "0.0.0.0/0"
       target_tags: "http-server"
       service_account_email: "{{ service_account_email }}"
       credentials_file: "{{ credentials_file }}"
       project_id: "{{ project_id }}"

  - name: Create instances based on image {{ image }}
     gce:
       instance_names: "{{ instance_names }}"
       machine_type: "{{ machine_type }}"
       image: "{{ image }}"
       state: present
       preemptible: true
       tags: http-server
       service_account_email: "{{ service_account_email }}"
       credentials_file: "{{ credentials_file }}"
       project_id: "{{ project_id }}"
       metadata: '{"sshKeys":"<Your gce user: Your id_rsa_public key>"}'
     register: gce

  - name: Save hosts data within a group
     add_host:
       hostname: "{{ item.public_ip }}"
       groupname: gce_instances_temp
     with_items: "{{ gce.instance_data }}"

  - name: Wait for ssh to come up
     wait_for: host={{ item.public_ip }} port=22 delay=10 timeout=60
     with_items: "{{ gce.instance_data }}"

  - name: Setting ip as instance fact
     set_fact: host={{ item.public_ip }}
     with_items: "{{ gce.instance_data }}"

  - name: Configure instance post-creation
     hosts: gce_instances_temp
     gather_facts: True
     remote_user: <Your gce user>
     become: yes
     become_method: sudo

     roles:
        - <path_to_role>/myapache
$
With the following playbook, we create the load balancer, indicating the name of our backend instances:
$ cat gce-lb.yml

---
- name: Playbook to create gce load balancing instance
  hosts: localhost
  connection: local
  gather_facts: True

  vars:
     service_account_email: <Your gce service account email>
     credentials_file: <Your json credentials file>
     project_id: <Your project id>

 tasks:
    - name: Create gce load balancer
    gce_lb:
      name: lbserver
      state: present
      region: us-central1
      members: ['us-central1-a/web1','us-central1-a/web2','us-central1-a/web3']
      httphealthcheck_name: hc
      httphealthcheck_port: 80
      httphealthcheck_path: "/"
      service_account_email: "{{ service_account_email }}"
      credentials_file: "{{ credentials_file }}"
      project_id: "{{ project_id }}"
$
We use the following playbook to join both tasks and obtain the simple instances of GCE Red Hat Enterprise Linux / Apache with load balancing:
$ cat gce-lb-apache.yml

---
# Playbook to create simple instances of gce centos/apache with load balancing
- import_playbook: gce-apache.yml
- import_playbook: gce-lb.yml
$

Run the playbook:

$ ansible-playbook gce-lb-apache.yml --key-file <Your_id_rsa_key>
When finished, we can check by curl, that the load balancer ip responds with the page published by each instance:
$ curl http://<your.load.balancer.ip>Check out the video of the playbook run:
Summary and Closing
What we’ve done here is to create (or re-use) playbooks to manage a task that would normally take an admin an hour or more if done manually. The initial learning curve around Ansible playbooks will pay off quickly when you start to use it for repetitive tasks that it can accomplish in minutes versus the time it takes you to do it manually. It also provides a form of documentation for new hires and more junior admins who can see how it’s done by reading off Ansible playbooks.
Finally, automation is key for shops that are looking to embrace DevOps best practices. I hope this example encourages you to use Ansible today to tackle a task you can automate!
Alex Callejas is a Technical Account Manager (TAM) based in Mexico City with more than 10 years experience as a system administrator.
執筆者紹介
チャンネル別に見る
自動化
テクノロジー、チームおよび環境に関する IT 自動化の最新情報
AI (人工知能)
お客様が AI ワークロードをどこでも自由に実行することを可能にするプラットフォームについてのアップデート
オープン・ハイブリッドクラウド
ハイブリッドクラウドで柔軟に未来を築く方法をご確認ください。
セキュリティ
環境やテクノロジー全体に及ぶリスクを軽減する方法に関する最新情報
エッジコンピューティング
エッジでの運用を単純化するプラットフォームのアップデート
インフラストラクチャ
世界有数のエンタープライズ向け Linux プラットフォームの最新情報
アプリケーション
アプリケーションの最も困難な課題に対する Red Hat ソリューションの詳細
仮想化
オンプレミスまたは複数クラウドでのワークロードに対応するエンタープライズ仮想化の将来についてご覧ください
