Convert2RHEL は、Red Hat Enterprise Linux (RHEL) に類似したオペレーティングシステム、または Red Hat Enterprise Linux (RHEL) から派生したオペレーティングシステム (CentOS Linux や Oracle Linux など) を変換する Red Hat ユーティリティです。サポートされているオペレーティングシステムの完全なリストについては、 このドキュメントをお読みください。詳細については、Terry Bowling のブログ記事 (Oracle Linux に関する記事はこちら) を参照してください。
Red Hat Satellite 6.10 では、まず Convert2RHEL の一括操作機能が導入されました。これについては、こちらの記事で説明しています。Satellite 6.11 は、これらの機能を次の 2 つの面で発展させています。
-
Ansible ロールにより、Convert2RHEL の Satellite サーバーの設定/準備を自動化
-
Ansible Playbook により、ホストの変換を自動化
以下のフローチャートは、Satellite 6.11 で Convert2RHEL の一括操作を実行するために必要なタスクの概要を示しています。

準備ができたら、Centos/Oracle Linux ホストを Satellite に登録し、ホストを RHEL に変換するジョブをスケジュールします。
この Ansible ロールは、個別の Ansible サーバーを使用して Satellite サーバーに手動で適用できることに注意してください。
ここでは、この新しい自動化の実装に必要なすべての手順について詳しく説明します。
Satellite サーバーを準備する
まず、こちらの手順に従って、付属の Ansible Roles をインポートします。
まず、[Configure] > [Roles] に移動します。
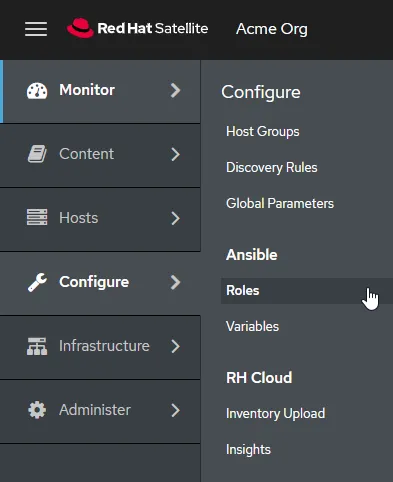
[Import…] をクリックします。

[Select All]、[Submit] の順にクリックします。

次に、Ansible ロールを Satellite サーバーで実行する前に、変数を作成する必要があります。これらの変数を使用して、Satellite サーバーで Convert2RHEL の一括操作をどのように構成するかを Ansible ロールに指示します。その内容には、サブスクリプションのマニフェスト、組織、場所、管理者の資格情報などの指定が含まれます。
Ansible ロールの変数を設定する最も簡単で迅速な方法は、Satellite サーバーで hammer コマンドラインユーティリティを使用することです。Ansible ロールの変数は、Satellite の Web UI を使用して設定することもできます。
この Satellite サーバーでは次の変数を定義しています。
|
変数 |
値 |
|
satellite_rhel_wait_for_syncs |
true |
|
satellite_manifest_path |
/usr/share/satellite/manifest_satellite_20220815T193102Z.zip |
|
satellite_organization |
Acme Org |
|
satellite_password |
Ha ha no you don’t |
|
satellite_username |
myee |
|
satellite_server_url |
https://ip-172-31-29-4.us-west-1.compute.internal |
|
satellite_validate_certs |
true |
|
satellite_content_rhel_enable_rhel7 |
true |
|
satellite_content_rhel_enable_rhel8 |
true |
次に、hammer ユーティリティを使用して Ansible ロールの変数を作成する方法を示します。
satellite_rhel_wait_for_syncs
この Ansible ロールは、一括 Convert2RHEL 操作の実行に必要なリポジトリーを設定し、同期します。 satellite_rhel_wait_for_syncs 変数は、リポジトリとの同期が完了するまで待機するように指示します。
rootとしてログインし、Satellite サーバーのコマンドラインインタフェースに次のように入力します。
hammer ansible variables create --location "Vancouver" --organization "Acme Org" --ansible-role redhat.satellite.convert2rhel --variable satellite_rhel_wait_for_syncs --variable-type boolean --default-value false --override true
satellite_manifest_path
Ansible ロールが実行されると、サブスクリプションのマニフェストがアップロードされ、すべての新しいホストに適切なライセンスが付与されます。有効なマニフェストをすでにアップロードしている場合は、再度アップロードする必要があります。
hammer ansible variables create --location "Vancouver" --organization "Acme Org" --ansible-role redhat.satellite.convert2rhel --variable satellite_manifest_path --variable-type string --default-value "/usr/share/satellite/manifest_satellite_20220815T193102Z.zip" --override true
satellite_organization/usr
この例で使用する Satellite 組織は「Acme Org」です。
hammer ansible variables create --location "Vancouver" --organization "Acme Org" --ansible-role redhat.satellite.convert2rhel --variable satellite_organization --variable-type string --default-value "Acme Org" --override true
satellite_password
Ansible ロールには Satellite 管理者の資格情報が必要です。ここにパスワードを入力します。
hammer ansible variables create --location "Vancouver" --organization "Acme Org" --ansible-role redhat.satellite.convert2rhel --variable satellite_password --variable-type string --default-value "YOUR_ADMIN_PASSWORD" --override true
注:パスワードを使用しないようにするには、代わりに Personal Access Tokens を設定します。

satellite_username
ここに管理者のユーザー名を入力します。
hammer ansible variables create --location "Vancouver" --organization "Acme Org" --ansible-role redhat.satellite.convert2rhel --variable satellite_username --variable-type string --default-value "myee" --override true
satellite_server_url
Satellite サーバーの URL は、ホストが curl ユーティリティを使用してアクセスするために必要とする URL です。
hammer ansible variables create --location "Vancouver" --organization "Acme Org" --ansible-role redhat.satellite.convert2rhel --variable satellite_server_url --variable-type string --default-value "https://ip-172-31-29-4.us-west-1.compute.internal" --override true
satellite_validate_certs
この値は true に設定する必要があります。
hammer ansible variables create --location "Vancouver" --organization "Acme Org" --ansible-role redhat.satellite.convert2rhel --variable satellite_validate_certs --variable-type boolean --default-value true --override true
satellite_content_rhel_enable_rhel7
この変数は、CentOS 7 (または Oracle) ホストから RHEL7 への変換を有効にするために RHEL7 コンテンツを同期するよう、Ansible ロールに指定します。RHEL7 のコンテンツを同期しない場合は、この変数で false を指定します。
hammer ansible variables create --location "Vancouver" --organization "Acme Org" --ansible-role redhat.satellite.convert2rhel --variable satellite_content_rhel_enable_rhel7 --variable-type boolean --default-value true --override true
satellite_content_rhel_enable_rhel8
この変数は、CentOS 8 (または Oracle) ホストから RHEL8 への変換を有効にするために RHEL8 コンテンツを同期するよう、Ansible ロールに指定します。RHEL8 のコンテンツを同期しない場合は、この変数で false を指定します。
hammer ansible variables create --location "Vancouver" --organization "Acme Org" --ansible-role redhat.satellite.convert2rhel --variable satellite_content_rhel_enable_rhel8 --variable-type boolean --default-value true --override true
変数が正しく設定されているかどうかは、Web UI で確認できます。サブメニューで Ansible の [Variables] に移動します。

作成した変数が表示されるまでページを進めます。

次に、Satellite が自身に対するリモート実行ジョブを実行できるようにする必要があります。
注:すでに Satellite サーバーに対してリモート実行ジョブを実行できるようにしてある場合、この手順は不要です。
root として Satellite サーバーにログインし、次のコマンドを実行します。
satellite-installer \
--foreman-proxy-plugin-remote-execution-ssh-install-key true
出力は次のようになります。
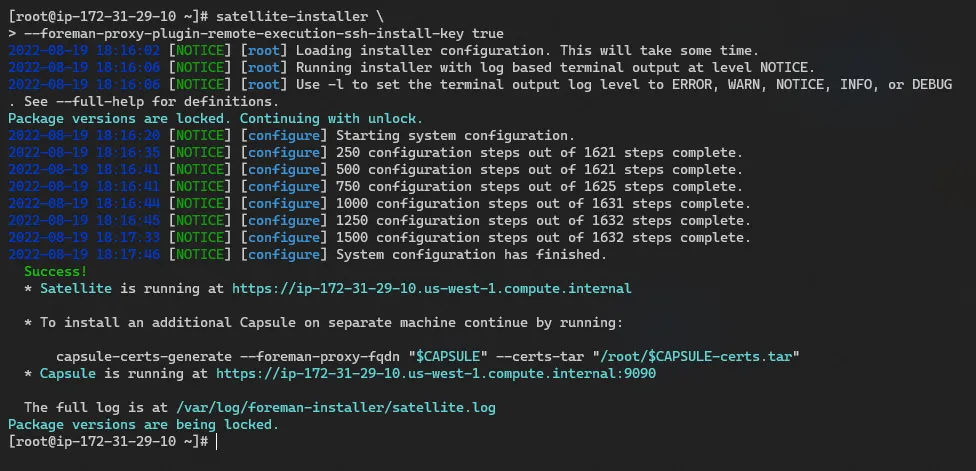
次に、Ansible ロールを Satellite サーバーに適用します。
[Hosts] > [All Hosts] をクリックします。

Satellite サーバーを編集します。

[Ansible Roles] タブをクリックします。
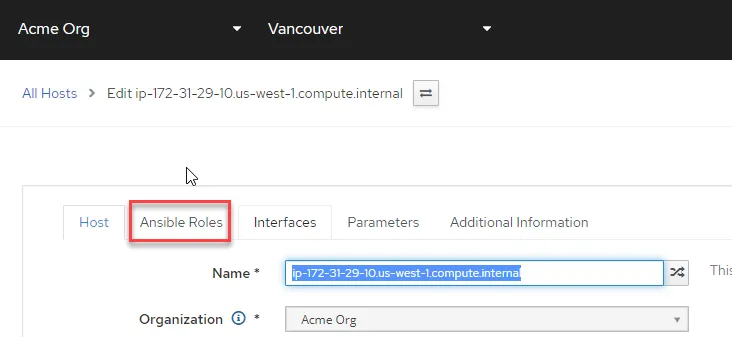
Convert2RHEL ロールは、サブメニューの 2 ページ目にあります。+ 記号をクリックして、redhat.satellite.convert2rhel ロールを Satellite サーバーに割り当てます。

[Submit] をクリックします。

ホスト情報ページにリダイレクトされます。[Schedule Remote Job] ボタンをクリックし、 [Run Ansible roles] を選択します。

ジョブのステータスを表示するページにリダイレクトされます。ジョブのリアルタイムステータスを確認するには、Satellite ホストをクリックします。
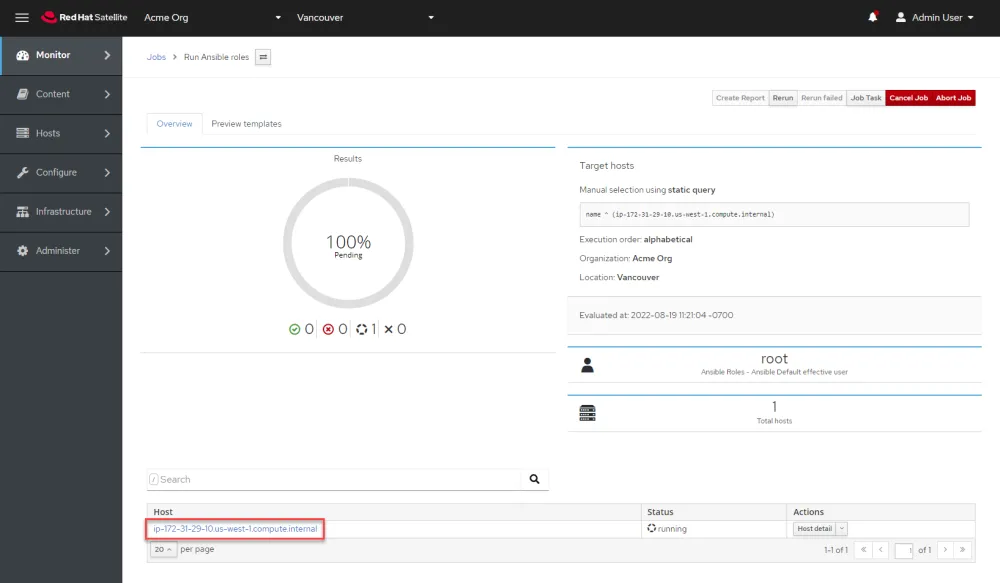
ジョブの各タスクが実行されていることを確認できます。

注:Ansible ロールは、必要なコンテンツの同期、ホストグループとアクティベーションキーの作成などのタスクを行います。Satellite 6.11 には、CentOS 7 ホストを登録するために作成されたアクティベーションキー「Convert2RHEL7」によって Convert2RHEL8 リポジトリが有効化されるというバグがあります。このバグを回避するには、「convert2rhel_centos7」アクティベーションキーでこのリポジトリをオーバーライドする必要があります。

変換を実行する
重要:変換を実行する前に、対象ホストを最新の状態にし、最新のカーネルで再起動する必要があります。
まず、変換するホストを登録する必要があります。ここでは CentOS7 ホストを変換します。[Hosts] > [Register Host] をクリックします。

テスト用の CentOS ホストでは、Satellite サーバーから認証局ファイルをコピーしていません。その方法の 詳細については、こちらをご覧ください。
Register Host メニューで、1) 「CentOS 7 converting」ホストグループ、2) 「Insecure」、3) 「Advanced」を選択します。[Insecure] オプションを使用すると、最初の自己署名証明書の検証を実行しないでスクリプトを実行できます。それ以降の通信は完全に保護されます。「Insecure」の使用を避けたい場合は、 こちらで証明書のインポートの詳細についてご確認ください。

次に、[Advanced] をクリックします。
[Register Host] メニューの [Advanced] コンテキストで、次のタスクを実行します。
-
「Activation Keys」がホストグループ「convert2rhel_centos7」から継承されていることを確認します。ここでは何もクリックする必要はありません。
-
[Generate] をクリックします。これにより curl スクリプトが生成されます。これは、コピーして CentOS ホストの CLI に貼り付けます。
-
コピーボタンをクリックして curl スクリプトをコピーします。

対象ホストの 1 つにログインします。ホストの正しいロケールをエクスポートします。
export LANG=en_US.UTF-8
curl スクリプトを貼り付けて実行します。出力例を次に示します。
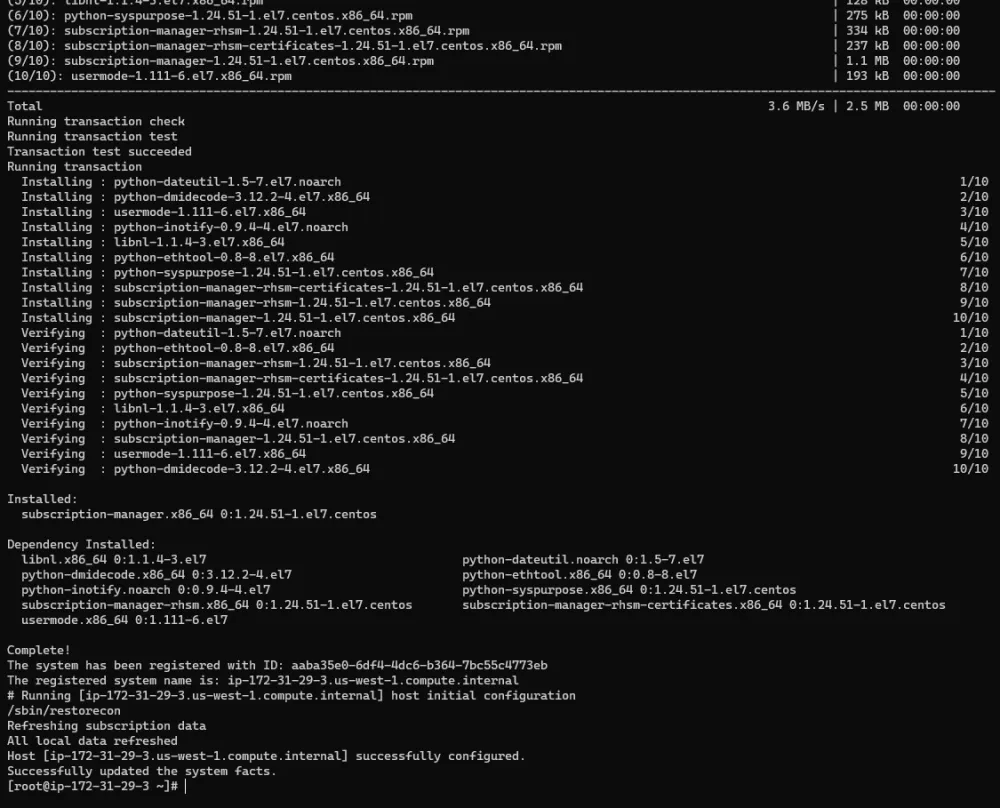
すべての対象ホストに対してこのタスクを繰り返します。
[Hosts] メニューに、Satellite に登録されているすべての CentOS ホストが表示されます。

次のタスクを実行して、Convert2RHEL 操作を開始します。
-
対象ホストを選択します。
-
[Select Action] をクリックし、 [Schedule Remote Job] を選択します。

[Job invocation] メニューで、次のタスクを実行します。
-
[Job category] ドロップダウンで、 [Convert 2 RHEL] を選択します。
-
[Activation Key] ドロップダウンで、 [convert2rhel_rhel7] を選択します。
-
[Submit] をクリックして、Convert2RHEL の一括操作を開始します。
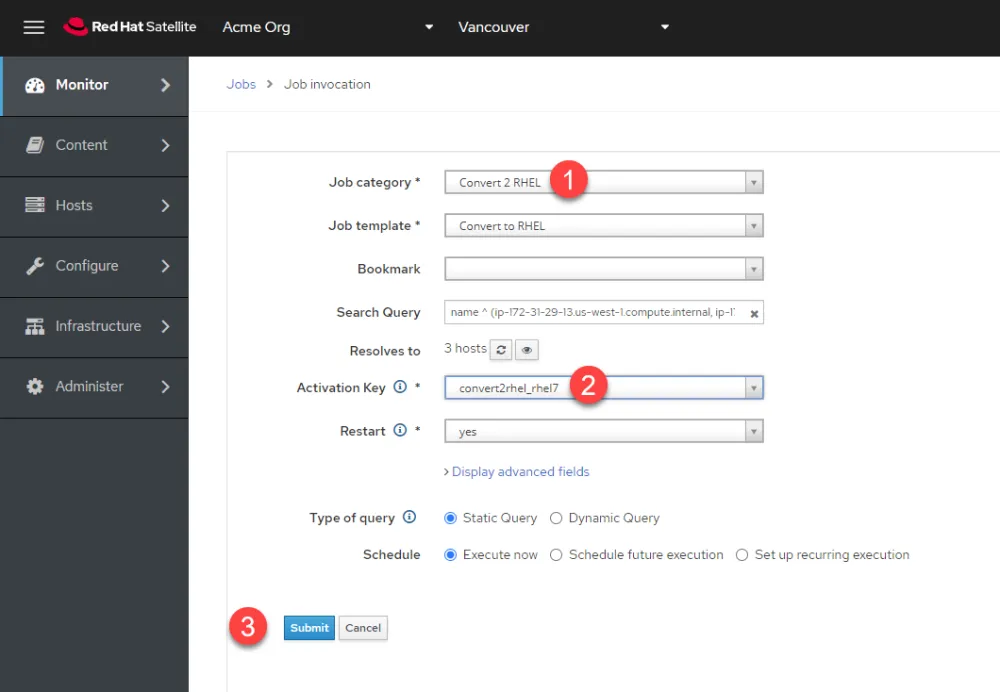
[Job Overview] メニューにリダイレクトされます。ここでホストをクリックすると、各ホストのジョブのリアルタイムステータスを表示できます。

ジョブのリアルタイムビューは次のとおりです。

最終的に、すべてのホストが一度に RHEL に変換されます。

詳細については、Convert2RHEL の公式ドキュメントを参照してください。
執筆者紹介
As a Senior Principal Technical Marketing Manager in the Red Hat Enterprise Linux business unit, Matthew Yee is here to help everyone understand what our products do. He joined Red Hat in 2021 and is based in Vancouver, Canada.
類似検索
2025 Red Hat Ansible Automation Platform: A year in review
New observability features in Red Hat OpenShift 4.20 and Red Hat Advanced Cluster Management 2.15
Technically Speaking | Taming AI agents with observability
Building practical self-healing IT | Technically Speaking
チャンネル別に見る
自動化
テクノロジー、チームおよび環境に関する IT 自動化の最新情報
AI (人工知能)
お客様が AI ワークロードをどこでも自由に実行することを可能にするプラットフォームについてのアップデート
オープン・ハイブリッドクラウド
ハイブリッドクラウドで柔軟に未来を築く方法をご確認ください。
セキュリティ
環境やテクノロジー全体に及ぶリスクを軽減する方法に関する最新情報
エッジコンピューティング
エッジでの運用を単純化するプラットフォームのアップデート
インフラストラクチャ
世界有数のエンタープライズ向け Linux プラットフォームの最新情報
アプリケーション
アプリケーションの最も困難な課題に対する Red Hat ソリューションの詳細
仮想化
オンプレミスまたは複数クラウドでのワークロードに対応するエンタープライズ仮想化の将来についてご覧ください
