Why an Introduction to ASP.NET on OpenShift?
In doing ASP.NET development using OpenShift, I've found that some tutorials out there for getting started on ASP.NET are
a) too complex, and
b) don't go over the basics of how it works
If you're going to use ASP.NET on OpenShift, you need to be able to understand it!
In this tutorial series, I'd like to give you a basic understanding of how ASP.NET works and what you're doing before you get started putting your projects on OpenShift. We'll get to that in an article soon enough.
In parts 1 & 2 of this tutorial, I'll be going over getting started quickly by using templates in Visual Studio Community 2015. This means that it'll be for Windows in this part. However, I'll go more in-depth with doing everything without templates in Visual Studio Code in a following tutorial, which will be applicable to Linux or Mac as well as Windows. If you're not using Windows, you can still follow along in parts 1 & 2 to get a general idea of how to create a REST endpoint in .NET Core.
Let's Begin!
Part 1 - Setting Up an ASP Service
I'm going to start you off by making a simple ASP service using a Controller. I want to make sure you understand how Controllers work before moving fully on to MVC.
Create your project
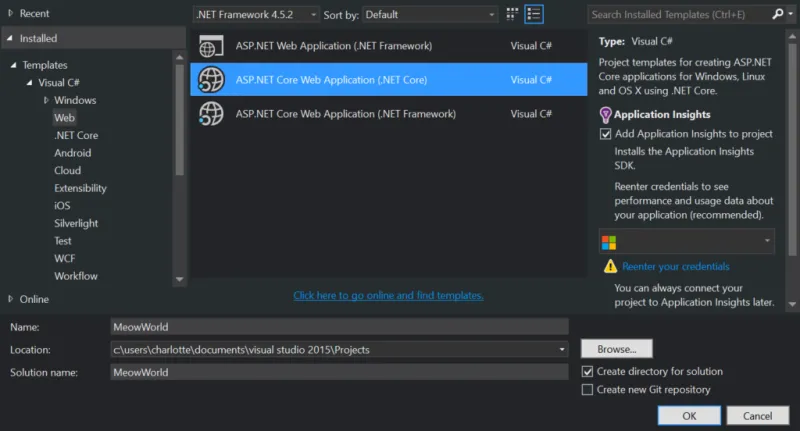
In Visual Studio (I'm using Community Edition 2015) click File and then New Project.
Under the Templates -> Visual C# -> Web folder, select ASP.NET Core Web Application (.NET Core). It's important that you select the .NET Core and not the .NET Framework as this is the .NET cross-platform library.
Enter your project name -- this can be anything you'd like, in this tutorial I'll be calling it MeowWorld.
By default, this location will be in your Visual Studio Projects folder, but feel free to change this if you'd like to store the tutorial someplace else.
We want to create a new solution (a solution is like a master project that holds the different projects you'll be working with) and we want to name the solution something.
By default, the solution is named the same as your project. This is perfectly fine, so leave it as is. But you're more than welcome to rename it if you'd like to.
Be sure Create a Directory is checked -- this is not important if you know what you're doing, but it helps a lot with keeping things organized.
You can also have Visual Studio create a git repository automatically. I won't be doing that as this is a tutorial, but for a larger scale project, you may want to.
Once you are happy with all the settings, click OK to move onto the next step.
Select Your Template
Here you should have three options. For this tutorial, you want to select the Web API option. I'll get into the other two with future tutorials.

If you build and run the project right now, it will open a browser window (or tab) and take you to .../api/values/ -- which will display a JSON array showing this:

Close your browser and make sure you stop your project by pressing the red square button (which says "Stop Debugging" when you mouse-over) so that you can edit it.
Editing Your Controller
In the Solution Explorer, go to Solution Name -> src -> Project Name -> Controllers -> ValuesController.cs and open it.
Notice how all the methods have an Http...`` attribute associated with them (HttpGet,HttpPost,HttpPut, andHttpDelete). This is the http method --HttpGet` is the typical one used for accessing a web page. Arguments can be passed to each method as query string variables (or route data -- more on routes later).
Right-Click on the controllers folder and create a new class called CatController.

Add the Microsoft.AspNetCore.Mvc library to help keep your code neat.
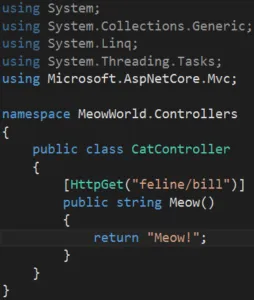
Add the following Meow method to your class:

Now run the code. In your browser, append /feline/bill/ to localhost:##### to see your work in action.

You are changing HttpGet("/feline/bill") to read HttpGet("cat/bill") and changing the name of the method from pubic string "Meow()" to public string Bill().
Note that neither the name of the controller or the method affect the path. It's common practice to make it all match though, so update the code to do that:

Now let's add another cat!

Now you can run the code and open your browser to: .../cat/steve/

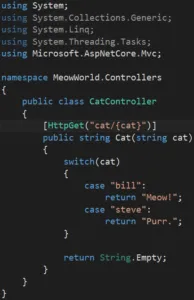
We can keep adding cats, but creating a method for each one can become annoying, so let's change that. We can use an argument for the cat name that will be passed as a query string. So our code can now look like this:

Now run the code and direct your browser to: .../cat?cat=bill and then .../cat?cat=steve
Now we have the cats in the same method, but the URL is a bit cluttered. This is where passing variables through routes comes in. All we need is a small change to the code:

And now we can go back to using: .../cat/bill and .../cat/steve.
That's it for the first part of this introduction. In making these two paths for the cats and what they say, you've gotten started in making an ASP.NET web service with two API calls! My next post will talk about getting and setting data, and how sessions work, as we expand the cat horde.
To be continued in: Part 2: Editing Data in ASP.NET!
About the author
More like this
Introducing OpenShift Service Mesh 3.2 with Istio’s ambient mode
Looking ahead to 2026: Red Hat’s view across the hybrid cloud
Crack the Cloud_Open | Command Line Heroes
Edge computing covered and diced | Technically Speaking
Browse by channel
Automation
The latest on IT automation for tech, teams, and environments
Artificial intelligence
Updates on the platforms that free customers to run AI workloads anywhere
Open hybrid cloud
Explore how we build a more flexible future with hybrid cloud
Security
The latest on how we reduce risks across environments and technologies
Edge computing
Updates on the platforms that simplify operations at the edge
Infrastructure
The latest on the world’s leading enterprise Linux platform
Applications
Inside our solutions to the toughest application challenges
Virtualization
The future of enterprise virtualization for your workloads on-premise or across clouds

