
Cockpit is an easy application to love. It puts your entire fleet of servers and workstations in a centralized control panel and gives you a fair amount of control over them. Perhaps it's unsurprising that this includes virtual servers and workstations, but many sysadmins don't realize they can manage virtual machine creation from Cockpit.
Suppose you've been using virt-manager, GNOME Boxes, or some other tool to spin up virtual machines, but you use Cockpit for diagnostics and maintenance. In that case, you can now consolidate your tasks by managing virtual machines in the same interface.
Install Cockpit
To create and manage virtual machines with Cockpit, you must install the cockpit-machines module on the computer you run Cockpit on:
$ sudo dnf install cockpit-machines
This assumes you already have Cockpit and virtual machines running on the machine. If you're just starting out with these tools, install these requirements:
$ sudo dnf install \
cockpit cockpit-machine libvirtd
Start Cockpit and libvirtd:
$ sudo systemctl start libvirtd
$ sudo systemctl start Cockpit
To log in to Cockpit, open your web browser to localhost:9090 and enter your username and password.
Virtual machines in Cockpit
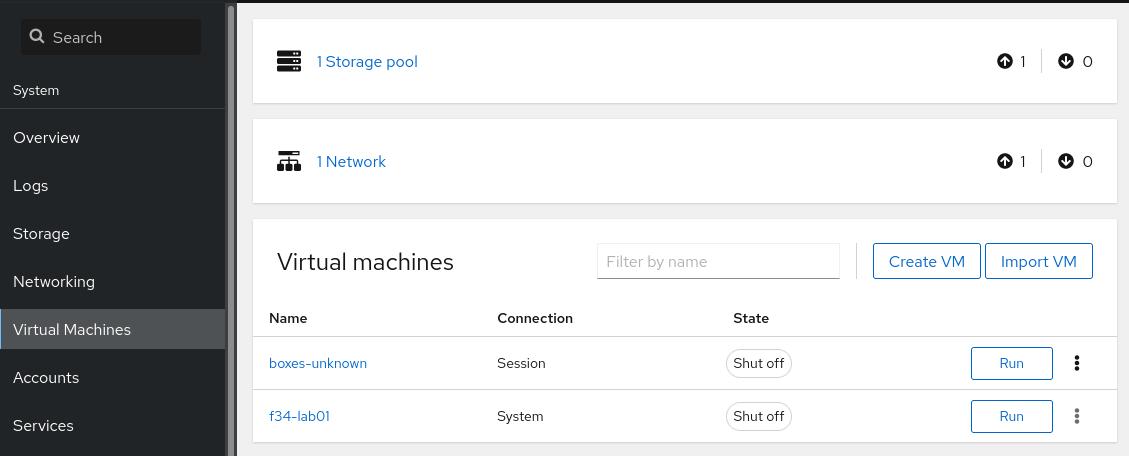
After installing the cockpit-machines module, there's a new Virtual Machines entry in the left column of Cockpit. Click on it to open the virtual machine panel.
If you run existing virtual machines with libvirt, Cockpit likely detects them and lists them in this panel. Should Cockpit fail to detect existing virtual machines, you can import them by clicking the Import VM button.
Just as GNOME Boxes or virt-manager do, Cockpit knows the virtual machine's state and can start or stop it. In the pop-up menu on the right, you can clone, rename, and delete the virtual machine.
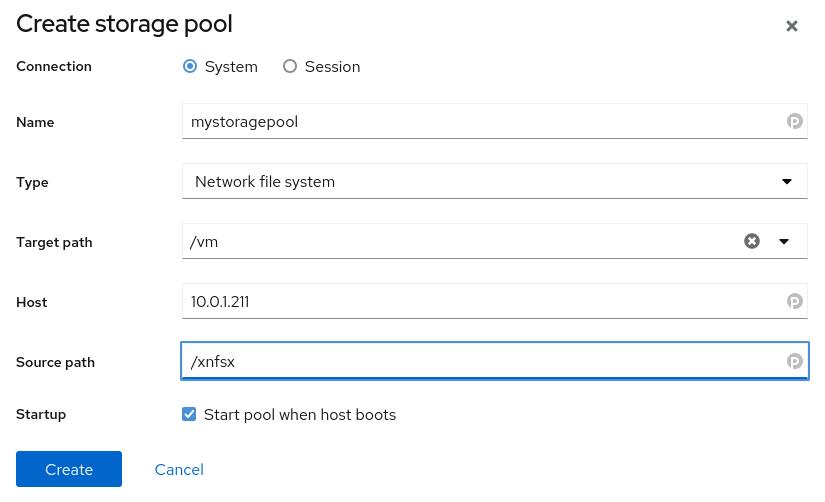
Create storage pools with Cockpit
A storage pool is space that you designate as being available to store virtual machine images. There's nothing necessarily special about it, but there's flexibility in what you can use. For instance, you can set a network location, an iSCSI target, or a filesystem.
To create a storage pool, click the Storage pool button at the top of the virtual machine panel.
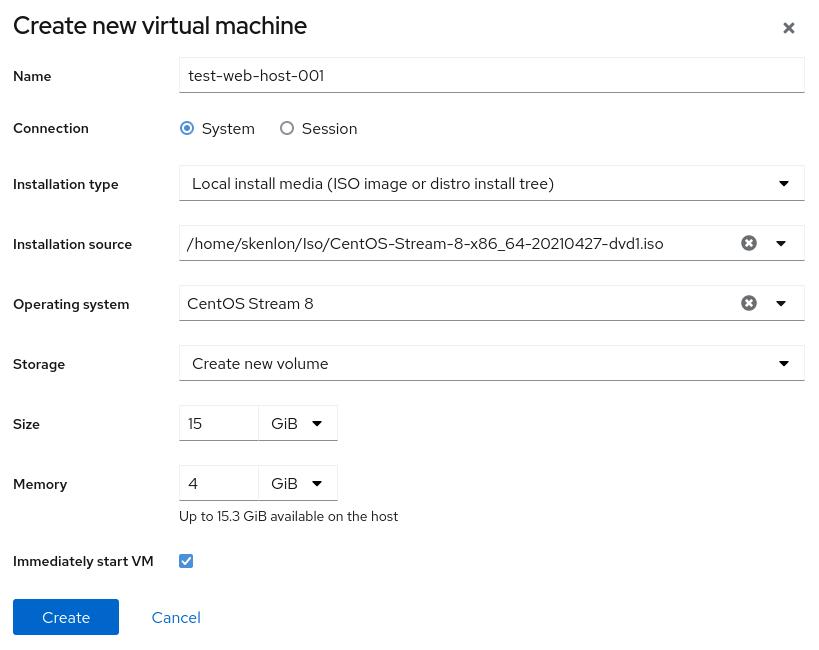
Create a new virtual machine
You can create a virtual machine directly from Cockpit. To create a new one, click the Create VM button on the right side of the virtual machine panel.
[ Download the free Advanced Linux cheat sheet. ]
All the usual options are present. You can download a recent operating system version from a drop-down list, or you can choose an ISO image on your local drive, or you can have the virtual machine boot from a Preboot Execution Environment (PXE) server.
Manage everything
Cockpit doesn't quite manage everything on your network, but it can manage a lot more than you might think from its default settings. Start using Cockpit to manage your virtual machines today, and you just might find yourself adding other modules to manage your Red Hat Enterprise Linux (RHEL) subscriptions, Podman containers, and more!
About the author
Seth Kenlon is a Linux geek, open source enthusiast, free culture advocate, and tabletop gamer. Between gigs in the film industry and the tech industry (not necessarily exclusive of one another), he likes to design games and hack on code (also not necessarily exclusive of one another).
More like this
Achieve high scalability using Red Hat Satellite Capsule Server
Taming existing tech: A strategic approach for insurance modernization
Container Roundup | Compiler
Untangling Networks | Compiler
Browse by channel

Automation
The latest on IT automation for tech, teams, and environments

Artificial intelligence
Updates on the platforms that free customers to run AI workloads anywhere

Open hybrid cloud
Explore how we build a more flexible future with hybrid cloud

Security
The latest on how we reduce risks across environments and technologies

Edge computing
Updates on the platforms that simplify operations at the edge

Infrastructure
The latest on the world’s leading enterprise Linux platform

Applications
Inside our solutions to the toughest application challenges
Virtualization
The future of enterprise virtualization for your workloads on-premise or across clouds