
Most businesses use Active Directory (AD) as it offers a single source of user management in the organization. Many organizations often incorporate additional authentication programs and protocols, such as Red Hat Single Sign On (RH-SSO), in tandem with AD. RH-SSO is based on Keycloak, an open source identity and access management tool for modern web applications.
This article demonstrates how to create the minimum necessary infrastructure to become familiar with and test RH-SSO. It also shows how to integrate it with Microsoft Active Directory Federation Services (ADFS) over the SAML protocol.
AD as an identity provider
ADFS is the web module that provides endpoints for using security tokens provided by either OpenID Connect (OIDC) or SAML Assertions with an AD server. ADFS is sometimes used as a bolt-on web server to AD on-premises, and it's common to find that an organization is running an old version. Nowadays, it's more common to use the Azure version of ADFS, which is more opinionated and perhaps easier to work with.
Because each AD system administrator has a different view on how to structure their AD database, providing one-size-fits-all guidance isn't practical. Instead, this article offers some pointers around the basic steps to set up integrations with ADFS.
Integration workflow
The Unified Modeling Language (UML) diagram below shows a high level of the authentication steps used in this tutorial for using ADFS as an authentication provider for RH-SSO using the SAML protocol. To be clear, this is just one example of identity brokering. SAML is highly flexible, as is RH-SSO.

Here's the workflow:
- The user clicks the SAML button on the RH-SSO form.
- This sends a redirect to the browser, along with a SAML request for Auth.
- The browser sends an HTTP GET to the ADFS server passing the parameters for the Auth.
- ADFS returns a login form requesting the user log in.
- The user completes the login form and submits it, then HTTP POSTs the credentials back to the ADFS server.
- ADFS checks the credentials. Assuming they're legitimate, ADFS posts a SAML response with the mapped claims to the RH-SSO server. (The endpoint contacted is configured during setup using metadata exported from RH-SSO.)
- Upon receipt of the SAMLresponse, RH-SSO allows users to update their details. Upon submission, the credentials are added to RH-SSO’s user database.
Topology
The following is a simple architectural example of how you can configure and integrate ADFS and SSO.

The diagram illustrates the basic topology for services that are aware of each other through exchanging metadata files:
FederationMetadata.xmlcontains information about your federation service for creating trusts, identifying token-signing certificates, and so on. It must be publicly available so that other parties can access and consume it. This file is generated first.IdentityProviderMetadata.xmlis the metadata produced and downloaded from Red Hat SSO. It contains the SAML service provider entity descriptor you can use to import into ADFS. This file is generated second.
Infrastructure architecture
To minimize the ADFS infrastructure footprint for this lab environment build, we've opted to provision a Windows Server 2016 VM, acting as the full Windows estate, and a Red Hat Enterprise Linux (RHEL) 8 virtual machine (VM), which runs SSO. In a more realistic scenario, the domain controller (DC), ADFS federation server, and Internet Information Services (IIS) web server would be split and made highly available.
- Domain controller
- Role: DC, DNS
- Host: ad01
- Operating system (OS): Win Server 2016
- Federation server
- Role: ADFS
- Host: ad01
- OS: Win Server 2016
- WebServer
- Role: IIS
- Host: ad01
- OS: Win Server 2016
- RH-SSO
- Role: JBoss
- Host: sso01
- OS: RHEL 8
Getting started
By the end of this tutorial, you will configure:
- Windows Server 2016 server with the following roles: DC, ADFS, IIS
- RHEL server running RH-SSO
- Trust between SSO and ADFS
- User authentication against AD via SSO
This setup uses the command-line interface (CLI) as much as possible: PowerShell for Windows hosts and Bash for Linux hosts. We're presenting these tasks to help make the manual steps involved in the process clear. In the real world, you would use automation to reduce deployment and configuration time and increase consistency, repeatability, and reliability.
[ Download now: A system administrator's guide to IT automation. ]
This article assumes that the machines are on the same network and can communicate with each other freely.
To work through these examples, you need:
- RHEL 8 installation media or virtual machine (VM) templates
- Microsoft Windows Server 2016 installation media or VM templates and associated licenses
- Credentials for Red Hat Subscription Manager (RHSM)
- RH-SSO installation media
1. Configure the domain controller
This example models a single organization, named Example (example.com). The following PowerShell command installs the AD DS Windows feature and its dependencies, invokes the deployment module, then configures the target system as an AD DC (and configures DNS for the domain):
PS> Rename-Computer -NewName ad01PS> Get-windowsfeature
PS> Install-WindowsFeature -name NET-Framework-Core
PS> Install-windowsfeature -name AD-Domain-Services -IncludeManagementTools

PS> Import-Module ADDSDeployment
PS> Install-ADDSForest `
-CreateDnsDelegation:$false `
-DatabasePath "C:\Windows\NTDS" `
-DomainMode "WinThreshold" `
-DomainName "example.com" `
-DomainNetbiosName "example" `
-ForestMode "WinThreshold" `
-InstallDns:$true `
-LogPath "C:\Windows\NTDS" `
-NoRebootOnCompletion:$false `
-SysvolPath "C:\Windows\SYSVOL" `
-Force:$true `
-SafeModeAdministratorPassword (ConvertTo-SecureString –String 'Pa33w0rd!' -AsPlainText -Force)
Validate the configuration:
PS> Get-Service adws,kdc,netlogon,dns
PS> Get-SmbShare
PS> dcdiag /q
PS> Resolve-DnsName ad01.example.com
PS> Resolve-DnsName example.com
1a. Configure users and groups
You can use AD security groups to group domain users with similar roles, departments, or organizational responsibilities or to reflect other organizational concerns. This allows you to assign permissions at the group level, reducing the management overhead as users join, change roles or departments, or leave. The following PowerShell example creates domain security groups and domain users and assigns those users to the groups.
[ Download now: A sysadmin's guide to Bash scripting. ]
First, create directories:
PS> New-ADGroup -Name "Officers" -SamAccountName Officers -GroupCategory Security -GroupScope Global -DisplayName "Bridge Officers" -Path "CN=Users,DC=example,DC=Com" -Description "Members of Bridge Officers"

PS> New-ADGroup -Name "Engineers" -SamAccountName Engineers -GroupCategory Security -GroupScope Global -DisplayName "Engineering Crew" -Path "CN=Users,DC=example,DC=Com" -Description "Members of Engineering Crew"
Then create your users:
PS> $Attributes = @{
   Enabled = $true
   ChangePasswordAtLogon = $false
   UserPrincipalName = "dallas@example.com"
   Name = "dallas"
   GivenName = "Captain"
   Surname = "Dallas"
   DisplayName = "Captain Dallas"
   Office = "Bridge"
   AccountPassword = "Thatfigures." | ConvertTo-SecureString -AsPlainText -Force
   }

PS> New-ADUser @Attributes

PS> $Attributes = @{
   Enabled = $true
   ChangePasswordAtLogon = $false
   UserPrincipalName = "kane@example.com"
   Name = "kane"
   GivenName = "XO"
   Surname = "Kane"
   DisplayName = "XO Kane"
   Office = "Bridge"
   AccountPassword = "Sillyquestion?" | ConvertTo-SecureString -AsPlainText -Force
}

PS> New-ADUser @Attributes

PS> $Attributes = @{
   Enabled = $true
   ChangePasswordAtLogon = $false
   UserPrincipalName = "parker@example.com"
   Name = "parker"
   GivenName = "Chief"
   Surname = "Parker"
   DisplayName = "Chief Parker"
   Office = "Engineering"
   AccountPassword = "Howyadoin?" | ConvertTo-SecureString -AsPlainText -Force
}

PS> New-ADUser @Attributes

PS> New-ADUser -Name "John Smith" -GivenName "John" -Surname "Smith" -SamAccountName "jsmith" -UserPrincipalName "jsmith@example.com" -Path "CN=Users,DC=example,DC=Com" -AccountPassword(Read-Host -AsSecureString "Input Password") -Enabled $true
Add users to security groups:
PS> Add-ADGroupMember -Identity Officers -Members dallas, kane
PS> Add-ADGroupMember -Identity Engineers -Members parker
And validate that the users exist:
PS> net user kane
PS> net user parker
PS> net user dallas
1b. Create a Group Managed Service Account (GMSA)
This account can also be used during the Install-AdfsFarm process instead of giving admin credentials:
Add-KdsRootKey -EffectiveTime (Get-Date).AddHours(-10)
New-ADServiceAccount FsGmsa -DNSHostName ad01.example.com -ServicePrincipalNames http/ad01.example.com
2. Configure the federation server (ADFS)
The following PowerShell command installs ADFS and its dependencies, then invokes the deployment module, and sets up a certificate. For ease of use, this lab environment creates a wildcard certificate (rather than the suggested method of creating specific common names):
PS> Install-windowsfeature adfs-federation –IncludeManagementTools
PS> Import-Module ADFS

PS> add-windowsfeature adcs-cert-authority -IncludeManagementTools
PS> Install-AdcsCertificationAuthority -CAType EnterpriseRootCa
PS> Install-PackageProvider nuget -force
PS> Install-Module -Name PSPKI -Force
PS> Import-Module -Name PSPKI

PS> New-SelfSignedCertificate -certstorelocation cert:\localmachine\Root -dnsname *.example.com
PS> Get-ChildItem -path cert:\LocalMachine\My
When running the next set of PowerShell commands, you get a credentials prompt. The format is domain\user (for example, example.com\Administrator). Replace the hashes with the cert thumbprint for the wildcard cert, which can be viewed using the Get-ChildItem command:
PS> $fscredential = Get-Credential
PS> Get-ChildItem -path cert:\LocalMachine\My

PS> Install-AdfsFarm -CertificateThumbprint ################################ -FederationServiceName ad01.example.com -ServiceAccountCredential $fscredential

PS> Install-AdfsFarm -CertificateThumbprint ################################ -FederationServiceName ad01.example.com -ServiceAccountCredential $fscredential -OverwriteConfiguration

PS> Set-AdfsProperties -EnableIdPInitiatedSignonPage $true
Should you encounter an error and need to rerun this, use the -OverwriteConfiguration flag.
[ Want to test your sysadmin skills? Take a skills assessment today. ]
To configure Active Directory's Device Registration Service (DRS), enter the domain and GMSA account you set up earlier:
PS> Initialize-ADDeviceRegistration
example.com\fsgmsa$
PS> Enable-AdfsDeviceRegistration
PS> Set-AdfsGlobalAuthenticationPolicy –DeviceAuthenticationEnabled $true
Add the required DNS records associated with your environment:
PS> Get-DnsServerResourceRecord -ZoneName example.com

PS> Add-DnsServerResourceRecordA -Name ad01 -ZoneName example.com -IPv4Address ###.###.##.###
PS> Get-DnsServerResourceRecord -ZoneName example.com -RRType A

PS> Add-DnsServerResourceRecordCName -ZoneName example.com -HostNameAlias "ad01.example.com" -Name "enterpriseregistration"
PS> Get-DnsServerResourceRecord -ZoneName example.com -RRType CName
3. Configure the web server (IIS)
Install the IIS feature and its dependencies, as well as the .NET framework:
PS> Install-WindowsFeature Web-Server -IncludeManagementTools -IncludeAllSubFeature -ComputerName ad01 -WhatIf
PS> Install-WindowsFeature Windows-Identity-Foundation -IncludeManagementTools
PS> Install-WindowsFeature Net-Framework-Core
The web address validates as long as ADFS is working:
PS> Start-Process "https://ad01.example.com/adfs/fs/federationserverservice.asmx"
PS> Start-Process "https://ad01.example.com/adfs/ls/idpinitiatedsignon.htm"
PS> Start-Process "https://ad01.example.com/FederationMetadata/2007-06/FederationMetadata.xml"
4. Install and configure RH-SSO
On your Linux server, install Java 8, unpack SSO into a relevant directory, and set up an administrator user, named sysadmin:
$ sudo dnf install java-1.8.0-openjdk
$ unzip rh-sso-7.3.0.GA.zip -d /opt
$ chmod -R 770 /opt/rh-sso-7.3
$ cd /opt/rh-sso-7.3/bin
$ sh ./add-user-keycloak.sh -u sysadmin
For the sake of this exercise, amend standalone.xml to bind to all available addresses:
$ cd /opt/rh-sso-7.3/standalone/configuration
$ sed -i 's/192.168.0.1/0.0.0.0/g' standalone.xml
$ sh ./standalone.sh
You'll see a login screen for SSO at http://192.168.56.102:8080/auth/. Using WebConsole, create a realm named demo. If you need assistance with this, follow the SSO getting started guide.
4a. Set up SSL
Verify connectivity to the ADFS server, export the certificate, and then import that server's certificate into a system trust store:
$ cd /opt/rh-sso-7.3
$ wget https://ad01.example.com/federationmetadata/2007-06/federationmetadata.xml
$ openssl s_client -connect ad01.example.com:443 2>/dev/null </dev/null |  sed -ne '/-BEGIN CERTIFICATE-/,/-END CERTIFICATE-/p' >> ad01.cer
$ cp ad01.cer /usr/share/pki/ca-trust-source/anchors/
$ update-ca-trust
$ trust list
$ wget https://ad01.example.com/federationmetadata/2007-06/federationmetadata.xml
4b. Configure outgoing HTTP requests
Create a Java trust store for JBoss, and then import the ADFS server certificate into it:
$ cd /opt/rh-sso-7.3
$ keytool -import -alias ad01.example.com -keystore truststore.jks -file ad01.cer
Add the block below for the trust-store configuration to the standalone.xml configuration file (near the bottom under the spi sections):
<spi name="truststore">
     <provider name="file" enabled="true">
         <properties>
             <property name="file" value="/opt/rh-sso-7.3/truststore.jks"/>
             <property name="password" value="test77"/>
             <property name="hostname-verification-policy" value="ANY"/>
             <property name="disabled" value="false"/>
         </properties>
     </provider>
 </spi>
After amending standalone.xml, restart JBoss to pick up the changes.
[ Download now: Advanced Linux commands cheat sheet. ]
4c. Enable inbound SSL/HTTPS for the Keycloak server
Keycloak is an open source identity and access management tool. To enable SSL (and HTTPS) for the Keycloak server, first create a Java trust store with a self-signed certificate:
$ cd /opt/rh-sso-7.3
$ keytool -genkey -alias localhost -keyalg RSA -keystore keycloak.jks -validity 10950
Enter keystore password:  test77
Re-enter new password: test77
$ keytool -importkeystore -srckeystore keycloak.jks -destkeystore keycloak.jks -deststoretype pkcs12
$ ./bin/kcadm.sh config truststore --trustpass test77 /opt/rh-sso-7.3/keycloak.jks
$ cp keycloak.jks standalone/configuration
In the JBoss CLI, add the key-store information, and enable extra logging:
$ cd /opt/rh-sso-7.3/bin
$ ./jboss-cli.sh

/connect

/core-service=management/security-realm=UndertowRealm:add()

/core-service=management/security-realm=UndertowRealm/server-identity=ssl:add(keystore-path=keycloak.jks, keystore-relative-to=jboss.server.config.dir, keystore-password=test77)

/subsystem=undertow/server=default-server/https-listener=https:write-attribute(name=security-realm, value=UndertowRealm)

/reload

/subsystem=logging/logger=org.keycloak.saml:add(level=DEBUG)

/subsystem=logging/logger=org.keycloak.broker.saml:add(level=DEBUG)
5. Integrate SSO with ADFS
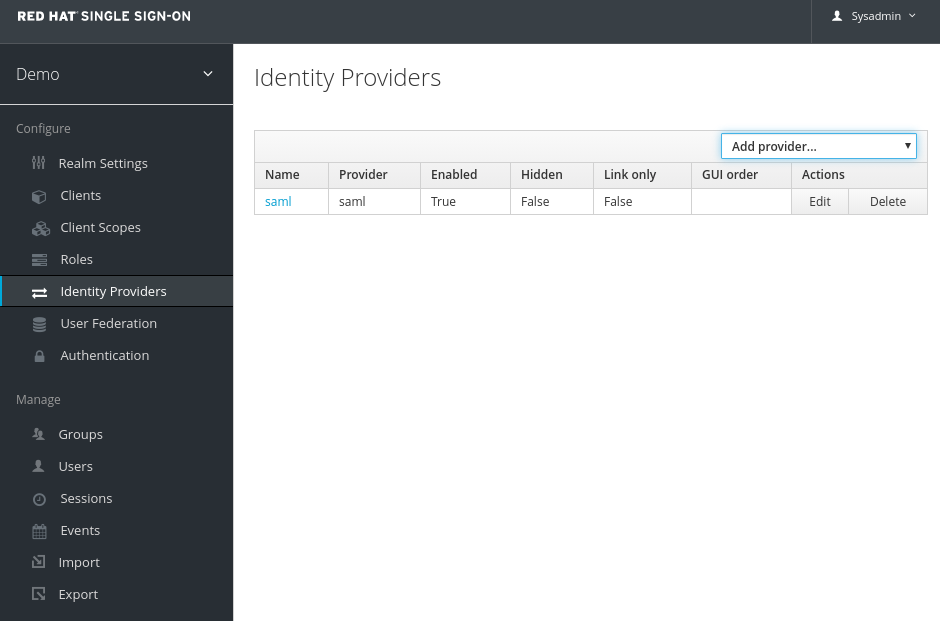
You can integrate SSO with ADFS in the RH-SSO web user interface (UI). Here's the overview of the process:
- Click Add Provider (SAML v2) to configure an identity provider.
- At the bottom of the page, select Import from URL and enter the ADFS server federation metadata URL (for example:
https://ad01.example.com/federationmetadata/2007-06/federationmetadata.xml). - Set NameID Policy Format to email.
- Click Save.

Export the SAML endpoint metadata from the Web UI or by accessing the endpoint https://<Hostname>:<PORT>/auth/realms/<Realm>/broker/<IdentityProvider>/endpoint/descriptor.
6. Integrate ADFS with SSO
The next step involves adding relying party trusts. Import the metadata for the SSO server's configuration details from the metadata XML file you previously downloaded or directly from the URL:
PS> Add-AdfsRelyingPartyTrust -Name "SSO" -MetadataFile "c:\metadatafile.xml" -AccessControlPolicyName "Permit Everyone"Specify the metadata XML file, as it allows the XML file to be modified in cases such as when the output is HTTP endpoints and not HTTPS.
From a URL:
PS> Add-AdfsRelyingPartyTrust -Name "SSO" -MetadataURL "https://<HOST>:<PORT>/auth/realms/<REALM_NAME>/broker/saml/endpoint/descriptor" -AccessControlPolicyName "Permit Everyone"Provide the URL for SSO's metadata, as mentioned above:
https://<HOST>:<PORT>/auth/realms/<REALM_NAME>/broker/saml/endpoint/descriptor6a. Add relying party trusts mapping rules
Then add relying party trust mapping rules. To add the rules, create the file C:\rules.txt with the following contents:
@RuleTemplate = "MapClaims"
@RuleName = "Name ID"
c:[Type == "http://schemas.microsoft.com/ws/2008/06/identity/claims/windowsaccountname"]
 => issue(Type = "http://schemas.xmlsoap.org/ws/2005/05/identity/claims/nameidentifier", Issuer = c.Issuer, OriginalIssuer = c.OriginalIssuer, Value = c.Value, ValueType = c.ValueType, Properties["http://schemas.xmlsoap.org/ws/2005/05/identity/claimproperties/format"] = "urn:oasis:names:tc:SAML:1.1:nameid-format:emailAddress");

@RuleTemplate = "LdapClaims"
@RuleName = "Email, subject"
c:[Type == "http://schemas.microsoft.com/ws/2008/06/identity/claims/windowsaccountname", Issuer == "AD AUTHORITY"]
 => issue(store = "Active Directory", types = ("http://schemas.xmlsoap.org/ws/2005/05/identity/claims/emailaddress", "http://schemas.microsoft.com/2012/12/certificatecontext/field/subjectname"), query = ";mail,sAMAccountName;{0}", param = c.Value);
Then run this PowerShell command to add the rules:
PS> Set-AdfsRelyingPartyTrust -TargetName "Destination Relying Party Trust" -IssuanceTransformRulesFile "C:\rules.txt"If you want to add additional rules with the ADFS Management graphical user interface (GUI), re-export the rules to text with:
PS> (Get-AdfsRelyingPartyTrust -Name "saml").IssuanceTransformRules | Out-File "C:\rules.txt"6b. Add rules with a GUI (optional)
The following is not needed if you run the previous PowerShell. However, it illustrates how to add relying party trust rules for mapping, which is easier to do via the GUI initially if you are unsure about the exact mapping configuration.
The two examples below show how to do the previous configuration for mapping user ID and user attributes.
Rules for mapping user IDs (GUI)
- In the Windows server configuration GUI, navigate to Relying Party Trusts and select the new item. Then, in the right-side Actions bar, select Edit Claim Issuance Policy.
- Select Add Rule.
- For the Claim rule template, select Transform an incoming claim.
- Map the following attributes:
- Claim rule name: Name ID
- Incoming claim type: Windows account name
- Outgoing claim type: Name ID
- Outgoing name ID format: Email
- Click Finish to add the rule.
Rules for mapping standard user attributes (GUI)
- In the Windows server GUI, navigate to Relying Party Trusts and select the new item. Then, in the Actions bar, select Edit Claim Issuance Policy.
- Select Add Rule.
- For the Claim rule template, select Send LDAP attributes as Claims.
- Map the following attributes:
- E-Mail-Addresses: Email address
- SAM-Account-Name: Subject name
- Add other attributes, if needed, such as your LDAP attributes for surname and given name.
- Click Finish to commit the rules.
7. Test and validate
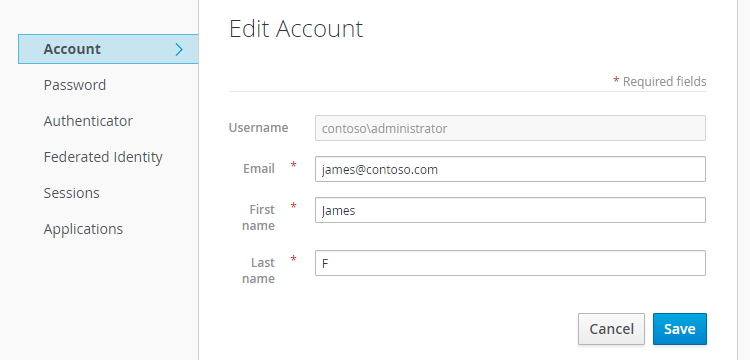
In a web browser, open your SSO login page for the realm you set up by navigating to https://<SSO_HOST>:<PORT>/auth/realms/<REALM>/account.
Click saml to go to your organization's page (ADFS).

Log on with an example user's AD credentials to validate that AD domain users can authenticate against SSO with their domain credentials.

You're logged in and redirected to SSO, where you now see your account details.
Once you've successfully logged on, you see a response in the JBoss server logs, which are stored at $JBOSS_HOME/standalone/logs/server.log:
<?xml version="1.0" encoding="UTF-8"?>samlp:Response ID="_b37dfe49-822b-46ec-8919-869ebfa63b2d" Version="2.0" IssueInstant="2020-02-20T12:26:54.794Z" Destination="https://192.168.56.102:8443/auth/realms/demo/broker/saml/endpoint" Consent="urn:oasis:names:tc:SAML:2.0:consent:unspecified" InResponseTo="ID_dd02e34f-40b2-4a2a-b972-87be50a8a9a7" xmlns:samlp="urn:oasis:names:tc:SAML:2.0:protocol">
<Issuer xmlns="urn:oasis:names:tc:SAML:2.0:assertion">http://ad01.example.com/adfs/services/trust</Issuer>
<samlp:Status>
  <samlp:StatusCode Value="urn:oasis:names:tc:SAML:2.0:status:Success" />
</samlp:Status>
[...]
   <ds:SignatureValue>5mX/hgPKocmMx7hxo1eB3/xtOOmrWjxXn3qhdI041B1w0tDl4a8p/FPmVHc85BxkXLfbPYbfbB7lAsYbTNMVPtl5IzF2vsTxVuJBRRtwko39PYbPGeVhbCQMeazxUMQEAcYtD5JL4slofNYmq6biH0iYbNYgvxlh7LMmHsg2Es1GjY9DvtidbGYrtNvUSysSuuaGznZbtFWWpbDOuNubJpGTEvSYO9H2AAqx9cY9376bBF6ui/deQ/4mTFK5OY3nvYdi4hs4s/fN4qvdqKm9JbuBjV3tuFZ8WEJrwFApD05yqJRA4bZkjyjU1Y0C/zGp4RaFE026Uv20wdr1gX7W/g==</ds:SignatureValue>
    <KeyInfo xmlns="http://www.w3.org/2000/09/xmldsig#">
      <ds:X509Data>
       <ds:X509Certificate>MIIC3DCCAcSgAwIBAgIQJjwM5Bqr44xDPLzkb1zUEDANBgkqhkiG9w0BAQsFADAqMSgwJgYDVQQDEx9BREZTIFNpZ25pbmcgLSBhZDAxLmNvbnRvc28uY29tMB4XDTIwMDIxOTEwNDQyOFoXDTIxMDIxODEwNDQyOFowKjEoMCYGA1UEAxMfQURGUyBTaWduaW5nIC0gYWQwMS5jb250b3NvLmNvbTCCASIwDQYJKoZIhvcNAQEBBQADggEPADCCAQoCggEBAO6P4+vK085uyOqs+0++l4KAk6tF6x4RScYecCYwcaFg+VqaOI1dvrwaVMSLLi...
       lt;/ds:X509Certificate>
      </ds:X509Data>
    </KeyInfo>
  </ds:Signature>
  <Subject>
    <NameID Format="urn:oasis:names:tc:SAML:1.1:nameid-format:emailAddress">example\Administrator</NameID>
    <SubjectConfirmation Method="urn:oasis:names:tc:SAML:2.0:cm:bearer">
      <SubjectConfirmationData InResponseTo="ID_dd02e34f-40b2-4a2a-b972-87be50a8a9a7" NotOnOrAfter="2020-02-20T12:31:54.801Z" Recipient="https://192.168.56.102:8443/auth/realms/demo/broker/saml/endpoint" />
    </SubjectConfirmation>
  </Subject>
  <Conditions NotBefore="2020-02-20T12:26:54.755Z" NotOnOrAfter="2020-02-20T13:26:54.755Z">
    <AudienceRestriction>
     <Audience>https://192.168.56.102:8443/auth/realms/demo</Audience>
    </AudienceRestriction>
  </Conditions>
  <AttributeStatement>
    <Attribute Name="http://schemas.microsoft.com/2012/12/certificatecontext/field/subjectname">
      <AttributeValue>Administrator</AttributeValue>
    </Attribute>
  </AttributeStatement>
  <AuthnStatement AuthnInstant="2020-02-20T12:26:54.643Z" SessionIndex="_8f000dc3-31cf-48c0-80d9-bcccaa409e2e">
    <AuthnContext>
     <AuthnContextClassRef>urn:oasis:names:tc:SAML:2.0:ac:classes:PasswordProtectedTransport</AuthnContextClassRef>
    </AuthnContext>
  </AuthnStatement>
</Assertion>
</samlp:Response>
If you don't see these messages, make sure that debug logs are active:
$JBOSS_HOME/bin/jboss-cli.sh --connect
/subsystem=logging/logger=org.keycloak/:add(category=org.keycloak,level=TRACE)
Integrated authentication
Congratulations. You have set up SSO integration with ADFS successfully! Red Hat's SSO technology is for the whole of your network, and it has the integration to enable it. Use RH-SSO to make your login process unified and universal.
About the author
James Force is a Principal Consultant at Red Hat whose career spans system administration, infrastructure, operations, system engineering, and platform engineering. He is a passionate advocate of open source, cloud native technologies, and the UNIX philosophy.
More like this
Satellite 6.19 delivers Red Hat Lightspeed on premise security monitoring
BackendTLSPolicy expands Gateway API transport security
Collaboration In Product Security | Compiler
Keeping Track Of Vulnerabilities With CVEs | Compiler
Browse by channel

Automation
The latest on IT automation for tech, teams, and environments

Artificial intelligence
Updates on the platforms that free customers to run AI workloads anywhere

Open hybrid cloud
Explore how we build a more flexible future with hybrid cloud

Security
The latest on how we reduce risks across environments and technologies

Edge computing
Updates on the platforms that simplify operations at the edge

Infrastructure
The latest on the world’s leading enterprise Linux platform

Applications
Inside our solutions to the toughest application challenges
Virtualization
The future of enterprise virtualization for your workloads on-premise or across clouds