
When a computer starts, the first processes that happen are on the motherboard. These processes are hardcoded into read-only memory (ROM) chips (collectively called "firmware") on the motherboard, and they happen fast, with the primary goal being to locate a hard drive with a bootable system on it.
Firmware is called firmware because it's not malleable, or at least not easily. BIOS and UEFI provide an interface for setting preferences, but firmware is mostly permanent. Once it finds a valid hard drive, the motherboard's firmware passes control of booting over to the hard drive. At that point, it's all software, and software is easy to update and modify. On most Linux systems, the first software that gets loaded is the Grand Unified Bootloader (GRUB), and it's interactive and customizable.
Check boot parameters
When you first encounter GRUB, it's before your operating system has booted. It's GRUB that controls how your operating system (OS) is about to boot. Press the e key on your keyboard to see exactly what parameters are being set.
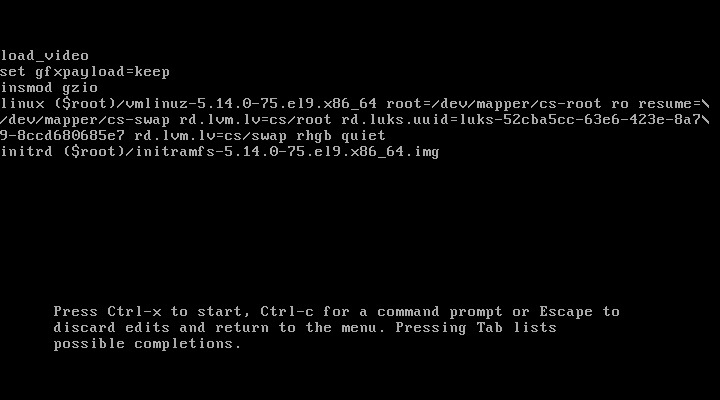
These boot parameters are auto-generated when you install or update your Linux system. There's rarely a reason to change them, and any changes you make from this screen disappear after you boot. It's through this screen that you can, for instance, rescue a machine with a lost password (unless you've also lost the password for an encrypted drive), force your device into airplane mode, deactivate the USB subsystem, redefine the boot drive, set the kernel version you want to boot, and change many other configuration options.
Many parameters are hard to notice, either because they occur at a low level or because they prevent your computer from booting when set wrong. But a safe and fun one to try is the vt.color setting, which sets the color scheme of the TTY text console.
[ Download the Advanced Linux commands cheat sheet. ]
By default, the text console is set to 0x07 (0 for a black background, and 7 for white foreground.) Move your cursor after the word quiet near the bottom of the text, add vt.color=0x17, and then press Ctrl+X to continue booting. When you reach a login screen, press Ctrl+Alt+F2 to switch to a text console.

Quite the difference from the usual white-on-black color scheme.
[ Get insight into managing your Linux environment for success. ]
There are many useful boot parameters, and they're all listed in the kernel documentation. Press press Ctrl+Alt+F1 to switch back to a graphical login screen.
Change GRUB
When you update your Linux system, GRUB is also updated so that when you boot, your computer loads the latest kernel. You can, however, make updates to GRUB yourself.
While /etc/grub2.cfg and the files in /etc/grub.d are reserved for automated updates, the file /etc/default/grub is for user customizations. For instance, to adjust the time it takes for GRUB to time out before the system boots to the default selection, open /etc/default/grub in your favorite text editor (using the sudo command for administrative privileges) and change GRUB_TIMEOUT from 5 to 15:
GRUB_TIMEOUT=15
Save and close the file. You've only changed a template file, not the actual data that GRUB uses when your computer boots. To integrate your change into the boot process, you must rebuild the active GRUB configuration using the grub2-mkconfig command. The path you use for output depends on your computer's firmware structure.
If your computer uses BIOS, then the (old) file /boot/grub2/grub.cfg exists, so you must replace it:
$ sudo grub2-mkconfig -o /boot/grub2/grub.cfg
If your computer uses UEFI, the file /boot/efi/EFI/redhat/grub.cfg exists, and you must replace it:
$ sudo grub2-mkconfig -o /boot/efi/EFI/redhat/grub.cfg
Reboot to see your change in effect.
Update GRUB's default menu selection
If you have more than one operating system on your computer, or if you prefer an older kernel to the latest one, you may want to choose your own default GRUB selection.
To see your current default kernel, use the --default-kernel option:
$ sudo grubby --default-kernel
/boot/vmlinuz-5.14.0-75.el9.x86_64
You can list all kernel menu entries with the --info option:
~]$ grubby --info=ALL
To change the default selection, use the --set-default option, along with the path to the kernel you want to boot:
$ sudo grubby --set-default /boot/vmlinuz-5.17.0-00.custom.x86_64
Verify your change:
$ sudo grubby --default-kernel
/boot/vmlinuz-5.17.0-00.custom.x86_64
The next time you boot, the default selection will be your chosen kernel.
Grand and versatile
GRUB may be called the "Grand Unified Bootloader," but its toolchain is full of variety. Not without good reason: GRUB is capable of managing boot entries for multiple OSes and multiple versions of the same OS, and all of those entries are subject to change due to system updates.
When looking to change your GRUB menu, it's important to identify what you want to change, and then learn where the configuration for that element is kept and whether it's managed by something automated, whether it's in a configuration file, or if there's a special command that can intercede for you. Let GRUB help you keep your system booting the way you want it to boot.
About the author
More like this
An introduction to the vi editor
Red Hat Enterprise Linux Long-Life Add-On: Your path to RHEL with no pre-determined end date
Infrastructure At The Edge | Compiler
Operating System Management | Compiler
Browse by channel

Automation
The latest on IT automation for tech, teams, and environments

Artificial intelligence
Updates on the platforms that free customers to run AI workloads anywhere

Open hybrid cloud
Explore how we build a more flexible future with hybrid cloud

Security
The latest on how we reduce risks across environments and technologies

Edge computing
Updates on the platforms that simplify operations at the edge

Infrastructure
The latest on the world’s leading enterprise Linux platform

Applications
Inside our solutions to the toughest application challenges
Virtualization
The future of enterprise virtualization for your workloads on-premise or across clouds