
If you're using virtual machines (VMs) with a hypervisor like KVM or QEMU, you may need to configure a network bridge to facilitate systems communicating on the same subnet.
One of my favorite ways to configure my network is nmtui, a user-friendly console tool for the NetworkManager utility.
I'll begin with an example setup. This is a common base-level deployment for virtual hosts, and the same principles apply to this configuration as they would to a structure for hundreds of hosts.
The setup
I'm using these components for this tutorial:
- KVM host (an on-premises physical server): Red Hat Enterprise Linux (RHEL) (IP address: 10.0.1.254)
- Virtualization: KVM or QEMU
- Virtual machines (guests): Ubuntu Server 20.04 (IP: 10.0.1.253) and Windows 10 Professional (IP assigned by DHCP)
The target network topology
A network bridge is a virtual switch that funnels the virtual guests through to the physical network interface card (NIC) of the RHEL host. The physical NIC of the host server is attached to an actual router with access to the rest of your LAN.

Create a bridge
First, launch the nmtui application. It runs in your terminal using an ncurses interface and is primarily menu-driven. Launch it with:
$ sudo nmtui
Using the arrow keys, navigate to Edit a Connection. This displays your existing connections.
If you see a Bridge device listed, you know that some software (GNOME Boxes, Vagrant, VirtualBox, or similar) has already generated a virtual switch for you. If you only need one virtual switch, then your work is technically done; however, you may want to create an additional bridge for a more complex network or just for your own edification.
Use the Tab key to select Add. In the New Connection window that appears, use the arrow keys to scroll through the list of connection types and select Bridge.
Place an Ethernet connection as an agent ("slaves" in the nmtui interface) to this new bridge connection.
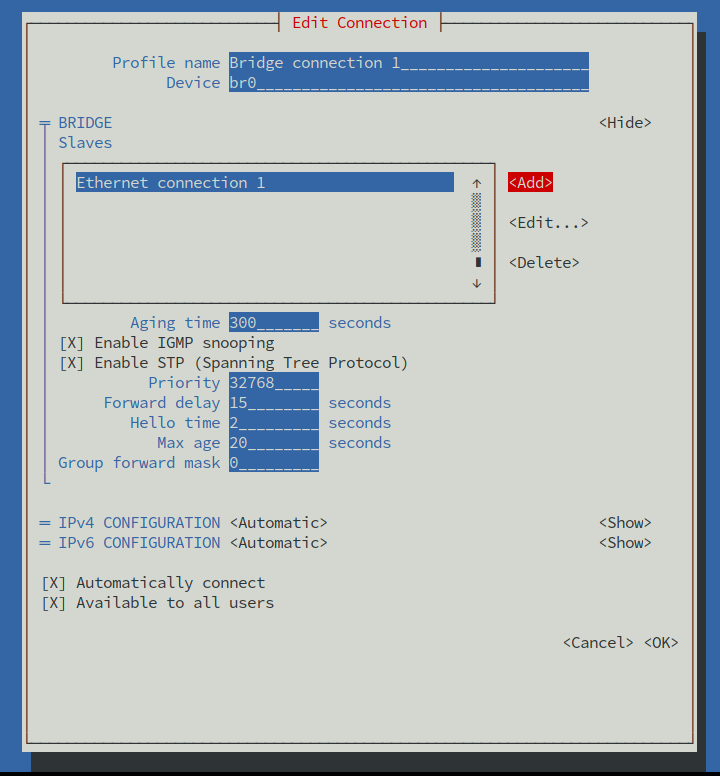
You can specify the network settings for this new Bridge (IP address, subnet mask, gateway, and DNS) if your wired connection requires manual setup.

After a couple of seconds, your new bridge connection is up and running. You can see that the local IP address is now assigned to your new bridge connection (br0).
4: virbr0: <BROADCAST,MULTICAST,UP,LOWER_UP> mtu 1500 qdisc noqueue state UP group default qlen 1000
   link/ether 52:52:00:fe:ed:cd brd ff:ff:ff:ff:ff:ff
   inet 10.0.1.254/24 brd 10.0.1.255 scope global noprefixroute br0
      valid_lft forever preferred_lft forever
I use the Virtual Machine Manager application (virt-manager) to configure the guest VMs. If you want a guest VM to have the same network subnet as the host, you can specify it in the guest virtual machine settings menu:
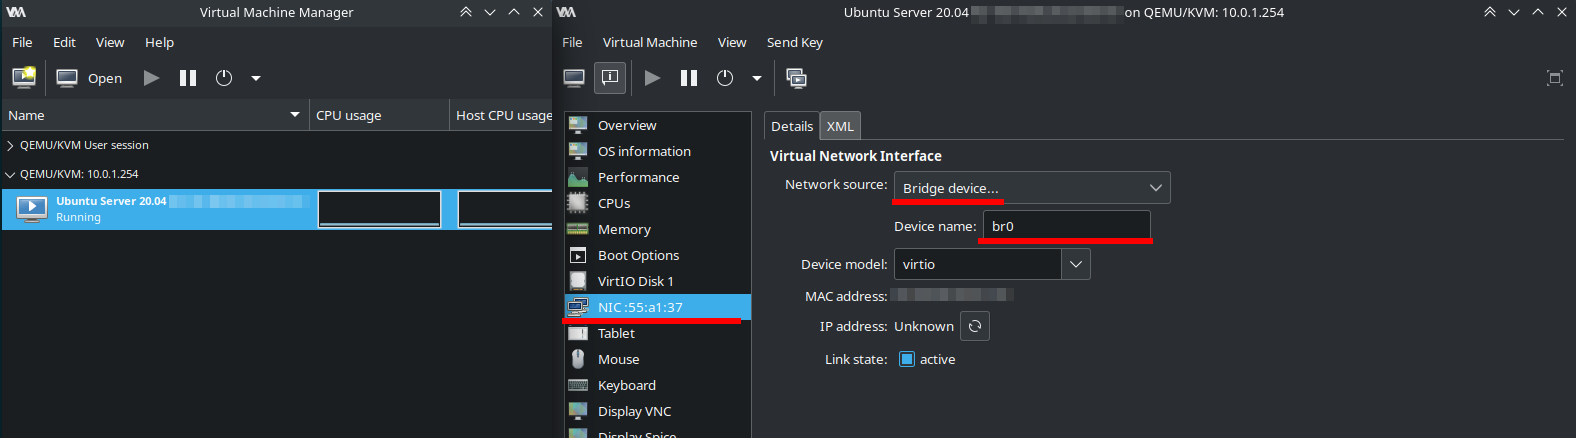
Then you can run the VM, check the IP, and make sure it is the same subnet as on the host (10.0.1.0, in my case):
3: enp1s0: <BROADCAST,MULTICAST,UP,LOWER_UP> mtu 1500 qdisc noqueue fq_code1 state UP group default qlen 1000
   link/ether de:3e:f4:9f:b2:c2 brd ff:ff:ff:ff:ff:ff
   inet 10.0.1.253/24 brd 10.0.1.255 scope global noprefixroute enp1s0
      valid_lft forever preferred_lft forever
   inet6 fe80::355c:fb77:a3ea:cf72/64 scope link noprefixroute
      valid_lft forever preferred_lft forever
You can now ping your KVM host and guests.
$ ping 10.0.1.254 -c 1
PING 10.0.1.254 (10.0.1.254) 56(84) bytes of data.
64 bytes from 10.0.1.254: icmp_seq=1 ttl=64 time=0.054 ms

--- 10.0.1.254 ping statistics ---
1 packets transmitted, 1 received, 0% packet loss, time 0ms
rtt min/avg/max/mdev = 0.054/0.054/0.054/0.000 ms
[ Learn what's new in Red Hat Ansible Automation Platform 2. ]
Wrap up
Providing network connectivity for virtual machines requires the same sorts of configuration as a physical network. The virtual switch provides a connectivity point for VMs to communicate over an IP network. Congratulations on your successful bridge network setup!
About the author
Vladimir Sokolenko has been working in the field of IT for more than 14 years, focusing on system administration (GNU/Linux, Windows Server, corporate hybrid cloud solutions, continuous maintenance of the entire IT infrastructure) and scripting (Python and Bash). He loves Linux and open source. He's also experienced in the development and support of different IT projects of various levels of complexity in Russia and Europe.
He has a master's degree in computer science, and in 2012, studied at Dresden Technical University as a postgraduate PhD student.
Browse by channel

Automation
The latest on IT automation for tech, teams, and environments

Artificial intelligence
Updates on the platforms that free customers to run AI workloads anywhere

Open hybrid cloud
Explore how we build a more flexible future with hybrid cloud

Security
The latest on how we reduce risks across environments and technologies

Edge computing
Updates on the platforms that simplify operations at the edge

Infrastructure
The latest on the world’s leading enterprise Linux platform

Applications
Inside our solutions to the toughest application challenges
Virtualization
The future of enterprise virtualization for your workloads on-premise or across clouds