
This post demonstrates creating a secondary network to provide east/west connectivity between Red Hat OpenShift Virtualization virtual machines (VMs). You will create an overlay network (disconnected from the node's physical network) and deploy a DHCP server in a pod connected to that network, which will offer IP addresses for the VM workloads. Keep in mind that configuring IP address management (IPAM) in a network attachment definition for VMs is not yet supported.
Note that this software-defined networking (SDN) approach, which uses a virtual networking infrastructure, does not require provisioning virtual local area networks (VLANs) or other physical network resources. As such, any scenarios requiring access to the node's physical network cannot be met by the layer 2 topology presented in this post.
Open Virtual Network
Open Virtual Network (OVN) is a series of daemons for the Open vSwitch that translate virtual network configurations into OpenFlow. It provides virtual networking capabilities for any type of workload on a virtualized platform (VMs and containers) using the same API.
OVN provides a higher layer of abstraction than Open vSwitch, working with logical routers and logical switches, rather than flows. More details can be found in the OVN architecture man page.
In essence, it is an SDN control plane for Open vSwitch.
Requirements
- OpenShift cluster, version >= 4.13
- OVN Kubernetes CNI configured as the default network provider
- A default StorageClass
Personas
- Developer: Person who creates and runs virtual machines. Must ask the cluster admin for the attachment names for the networks to which the VMs will connect.
- Cluster admin: Person with cluster network admin permissions. They can create network-attachment-definitions.
The overlay definition
Provision the following YAML to define the overlay, which will configure the secondary attachment for the KubeVirt VMs.
apiVersion: k8s.cni.cnf.io/v1
kind: NetworkAttachmentDefinition
metadata:
  name: flat12
spec:
    config: |2
      {
        "cniVersion": "0.3.1",
        "name": "flat12",
        "netAttachDefName": "default/flat12",
        "topology": "layer2",
        "type": "ovn-k8s-cni-overlay"
      }
Please refer to the OpenShift documentation for details on each of the knobs.
The above example will configure a cluster-wide overlay network on layer 2. This means the users are responsible for providing the VM's IP addresses for the overlay network—either manually, via cloud-init, or by deploying a DHCP server in the overlay network. Deploying the DHCP server is a simple way of achieving the latter.
The following image depicts the overall idea of the scenarios:
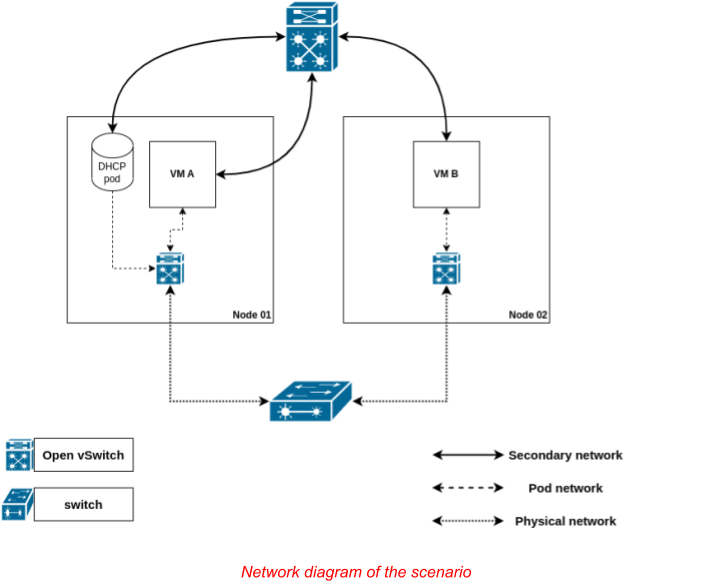
In it, the pod network is used to access the outside world (e.g., the Internet) and Kubernetes services, while the secondary network is used for communication between the VMs (e.g., an application running on VMA accesses a database deployed on VMB).
It is also worth pointing out that the value of the netAttachDefName attribute must match the namespace/name of the surrounding NetworkAttachmentDefinition object.
NOTE: This step requires cluster admin permissions.
Deploying the DHCP server
Once the administrator provisions the network definition, the developer should deploy the DHCP server. Use the following YAML for that:
---
kind: ConfigMap
apiVersion: v1
metadata:
 name: dhcp-server-conf
data:
 dhcpd.conf: |
   authoritative;
   default-lease-time 86400;
   max-lease-time 86400;
   subnet 192.168.123.0 netmask 255.255.255.0 {
           range 192.168.123.2 192.168.123.254;
           option broadcast-address 192.168.123.255;
   }
---
apiVersion: v1
kind: PersistentVolumeClaim
metadata:
 name: dhcp-db
spec:
 accessModes:
   - ReadWriteOnce
 resources:
   requests:
     storage: 25Mi
---
apiVersion: apps/v1
kind: Deployment
metadata:
 name: dhcp-server
 labels:
   app: dhcp
spec:
 replicas: 1
 selector:
   matchLabels:
     app: dhcp
 template:
   metadata:
     labels:
       app: dhcp
     annotations:
       k8s.v1.cni.cncf.io/networks: '[
         {
           "name": "flatl2",
           "ips": ["192.168.123.1/24"]
         }
       ]'
   spec:
     containers:
     - name: server
       image: ghcr.io/maiqueb/ovn-k-secondary-net-dhcp:main
       args:
         - "-4"
         - "-f"
         - "-d"
         - "--no-pid"
         - "-cf"
         - "/etc/dhcp/dhcpd.conf"
       securityContext:
         runAsUser: 1000
         privileged: true
       volumeMounts:
       - name: multus-daemon-config
         mountPath: /etc/dhcp
         readOnly: true
       - name: dhcpdb
         mountPath: "/var/lib/dhcp"
     volumes:
     - name: multus-daemon-config
       configMap:
         name: dhcp-server-conf
         items:
         - key: dhcpd.conf
           path: dhcpd.conf
     - name: dhcpdb
       persistentVolumeClaim:
         claimName: dhcp-db
The YAML above provisions a deployment (with a single replica) that will ensure the DHCP server is always up. Its specification has a few elements that should be highlighted:
- The IP address of the DHCP server is statically configured in the pod template.
- The DHCP server configuration is provided via a ConfigMap. It must exclude the static IP address assigned to the DHCP server from its advertised range.
- The DHCP server leases must be stored in persistent storage so it can survive the pod dying for whatever reason.
- This configuration only works for one replica. Thus, there is a single point of failure.
Remember, this is a simple example and should not be used in production. Setting static IP addresses via cloud-init is recommended since they do not rely on a single point of failure (the DHCP server).
The container image was created from this specification.
Deploying the VM workloads
Finally, the user should deploy the VM workloads. For that, execute the following command:
cat <<EOF | oc apply -f -
apiVersion: kubevirt.io/v1
kind: VirtualMachine
metadata:
 name: vm-server
spec:
 running: true
 template:
   spec:
     domain:
       devices:
         disks:
           - name: containerdisk
             disk:
               bus: virtio
           - name: cloudinitdisk
             disk:
               bus: virtio
         interfaces:
         - name: default
           masquerade: {}
         - name: flatl2-overlay
           bridge: {}
       machine:
         type: ""
       resources:
         requests:
           memory: 1024M
     networks:
     - name: default
       pod: {}
     - name: flatl2-overlay
       multus:
         networkName: flatl2
     terminationGracePeriodSeconds: 0
     volumes:
       - name: containerdisk
         containerDisk:
           image: quay.io/containerdisks/fedora:38
       - name: cloudinitdisk
         cloudInitNoCloud:
           userData: |-
             #cloud-config
             password: fedora
             chpasswd: { expire: False }
             packages:
             - nginx
             runcmd:
             - [ "systemctl", "enable", "--now", "nginx" ]
---
apiVersion: kubevirt.io/v1
kind: VirtualMachine
metadata:
 name: vm-client
spec:
 running: true
 template:
   spec:
     domain:
       devices:
         disks:
           - name: containerdisk
             disk:
               bus: virtio
           - name: cloudinitdisk
             disk:
               bus: virtio
         interfaces:
         - name: default
           masquerade: {}
         - name: flatl2-overlay
           bridge: {}
       machine:
         type: ""
       resources:
         requests:
           memory: 1024M
     networks:
     - name: default
       pod: {}
     - name: flatl2-overlay
       multus:
         networkName: flatl2
     terminationGracePeriodSeconds: 0
     volumes:
       - name: containerdisk
         containerDisk:
           image: quay.io/containerdisks/fedora:38
       - name: cloudinitdisk
         cloudInitNoCloud:
           userData: |-
             #cloud-config
             password: fedora
             chpasswd: { expire: False }
EOF
The YAML provided above will create two VMs, each with a network interface connected to the cluster default network (granting access to Kubernetes services and access to the Internet), plus a secondary interface connected to the overlay defined in the network attachment definition presented above.
The VM named vm-server installs and starts nginx via cloud-init. The server starts and listens on port 80 (the default port).
Once both VMs have booted up, check their IP addresses. Confirm they can use the overlay to communicate by accessing the nginx web server in the vm-server VM:
# check the IP address of the `server` VM
oc get vmi vm-server -ojsonpath="{@.status.interfaces}" | jq
[
 {
   "infoSource": "domain, guest-agent",
   "interfaceName": "eth0",
   "ipAddress": "10.135.1.154",
   "ipAddresses": [
     "10.135.1.154"
   ],
   "mac": "02:2e:2f:00:00:0e",
   "name": "default",
   "queueCount": 1
 },
 {
   "infoSource": "domain, guest-agent, multus-status",
   "interfaceName": "eth1",
   "ipAddress": "192.168.123.5",
   "ipAddresses": [
     "192.168.123.5",
     "fe80::2e:2fff:fe00:f"
   ],
   "mac": "02:2e:2f:00:00:0f",
   "name": "flatl2-overlay",
   "queueCount": 1
 }
]
# connect to the `client` VM over the serial console
# user / password are both `fedora`
virtctl console vm-client
Successfully connected to vm-client console. The escape sequence is ^]
vm-client login: fedora
Password:
[fedora@vm-client ~]$ curl -I 192.168.123.5 # curl defaults to port 80
HTTP/1.1 200 OK
Server: nginx/1.24.0
Date: Wed, 08 Nov 2023 15:19:56 GMT
Content-Type: text/html
Content-Length: 8474
Last-Modified: Mon, 20 Feb 2023 00:00:00 GMT
Connection: keep-alive
ETag: "63f2b800-211a"
Accept-Ranges: bytes
Wrap up
This post shows how to use OVN-Kubernetes to create an overlay to connect VMs in different nodes using secondary networks without configuring any physical networking infrastructure.
Since IPAM cannot be used for virtualized workloads on OpenShift, you can work around that by deploying a DHCP server in a pod attached to the overlay network.
執筆者紹介
Miguel is a Principal Software Engineer for OpenShift Virtualization, working at Red Hat since 2018.
His main interests are SDN / NFV, functional programming, containers and virtualization.
Miguel is a member of the Network Plumbing Working Group, a maintainer of several CNI plugins (whereabouts, macvtap), and a contributor to some others (ovn-kubernetes, multus).
類似検索
vi エディター入門
急激に進化する AI の脅威に対応する防御作とは
Container Roundup | Compiler
Untangling Networks | Compiler
チャンネル別に見る

自動化
テクノロジー、チームおよび環境に関する IT 自動化の最新情報

AI (人工知能)
お客様が AI ワークロードをどこでも自由に実行することを可能にするプラットフォームについてのアップデート

オープン・ハイブリッドクラウド
ハイブリッドクラウドで柔軟に未来を築く方法をご確認ください。

セキュリティ
環境やテクノロジー全体に及ぶリスクを軽減する方法に関する最新情報

エッジコンピューティング
エッジでの運用を単純化するプラットフォームのアップデート

インフラストラクチャ
世界有数のエンタープライズ向け Linux プラットフォームの最新情報

アプリケーション
アプリケーションの最も困難な課題に対する Red Hat ソリューションの詳細
仮想化
オンプレミスまたは複数クラウドでのワークロードに対応するエンタープライズ仮想化の将来についてご覧ください